Refinishing and Sealing Butcher Block RV Counters

We bought two slabs of butcher block from home depot. Two different sizes: a counter top depth slab 6ft long for kitchen counter and then an small island size 4ft slab that we cut for dining table

I used two different products to finish the butcher block: 

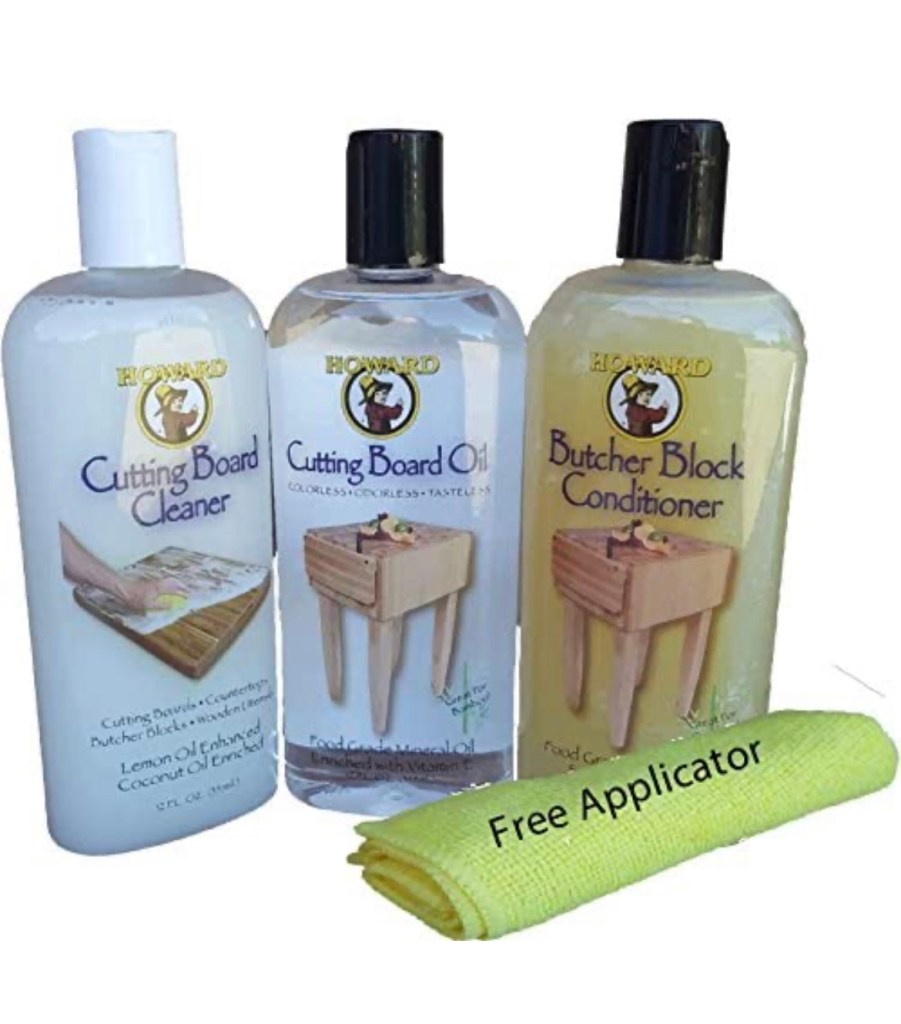
First, I used cutting board oil and conditioner that I bought from aubachaun- this was used to protect the surface and give the wood some oil. I used these two products while I decided what to buy a more permanent sealer.

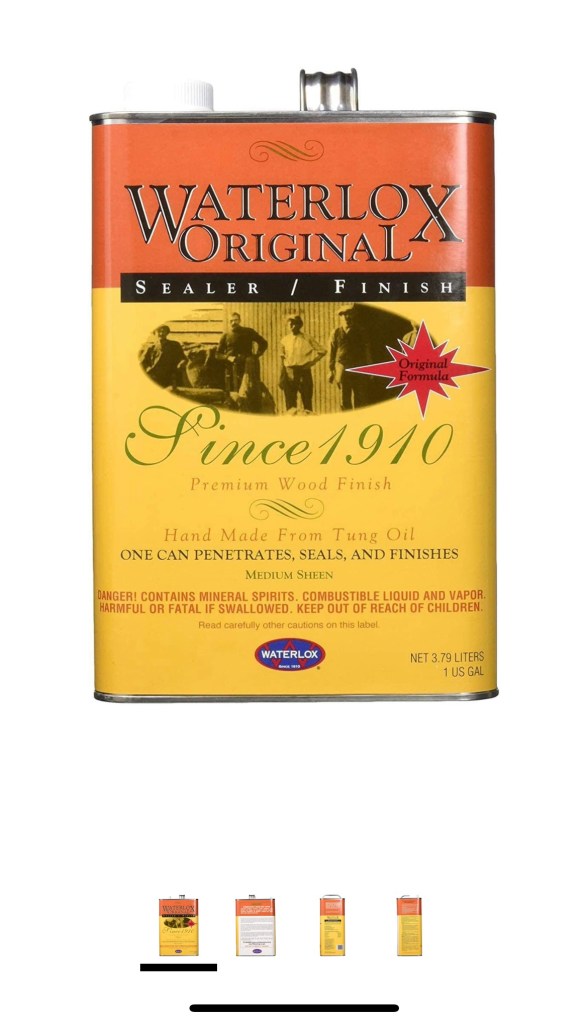
Waterlox—is a durable finish, food safe and advertises that water rings from cups do not show up or leave water ring stains on top of the finish. Can be used in kitchens, bathrooms, or bar projects and is easy to apply and maintain. I would definitely agree with the easy apply 

Next, I settled on @waterlox sealer- I decided to use the ā€œmedium sheenā€ option so it has a little sheen and way easier to clean. I was assuming it was going to be a satin finish, but it turns out after 4 coats (water lox required 4 coats for soft wood) – it is semi-gloss sheen for sure! 


Steps: (I have this video tutorial on my Instagram page in the IGTV section too!!)


1-      Bought butcher block slabs at home depot (counter depth and small island slab)

2-      Removed plastic, measured, cut the butcher block to size—both table & countertop—

3-      When cutting to size- we used a jig saw, mini circular dewalt saw (my newest tool & obsession)

4-      Sanded entire surface and corners- using dewalt circular palm sander – started with 120, 220 – filled all holes or knots with food filler an then did the final run of sanding with 320 grit

5-      Cleaned off all sawdust with washcloth and slightly damp paper towels (don’t saturate or wet too much—or you’ll have to wait for it to dry to stain or seal

6-      Used @Howards cutting board oil x3 coats 

7-      Used @Howards wood conditioner x2 coats 

8-      Waterlox was next—when reading the directions is stated that it is best used when on bare wood- which I didn’t have anymore- I had oiled wood. I did a very light sand with 320 grit to just get a little rough surface for the waterlox to stick to 

9-      Waterlox recommended 4 coats of the finish for soft wood which is what butcher block is made of.

You have to wait 24 hours in between coats (*just an FYI the finish will go on with bubbles, especially if you use a foam roller- which I did- it will not dry with bubbles like a water based polyurethane willJ ) 

10-   In between coats I took a 320 grit paper and by hand did a very light sand of entire surface- the directions stated this was not necessary, but I did it anyway. (I chose to do it mostly because the surface had oil on it before I did the waterlox- so the more Ican get the layers to stick the better it’ll be/more durable)

11- The ingredients in the waterlox made it so the foam roller did not dry in between all coats, so I was able to continue to use the exact roller for every coat and that was amazing!! J

RV Reno Progression

Good afternoon!! Let’s chat all things RV Reno!! This is a list for you guys, but mostly me!!šŸ˜‚

These are the steps we are following for demo & Reno progression:

⁃ demo upper cabinets and windows coverings for living room/ bedroom ā˜‘ļø

⁃ Patch holes, clean walls, tape ā˜‘ļø

⁃ Prime interior x 2/3 coats- using kilz 2 primer on walls & wooden cabinets. Using a scotch brute ā€œscrubbing padsā€ to sand/rough up the wooden doors- this is an alternative to sanding all of them.ā˜‘ļøā˜‘ļø

⁃ Paint interior- SW Snowbound satinā˜‘ļøā˜‘ļø

⁃ Pick lighting!!! Still haven’t ordered or picked?!?

⁃ Not demo related- haven’t planned the route or anything- but did request the time off workšŸŽ‰šŸ˜…

– demo kitchen counter/ sink

– put in traffic master flooring!!***

Kitchen— will be first- once painted-

⁃ Epoxy kitchen cabinets (going to use minwax water based & probably roll on one coat to make more durable)

⁃ Butcher block countertop install- cut to size (around oven & unique L shape

⁃ Find how to treat & seal counters (will do after tile)

⁃ Stacked Square Tile- from homdepot- will use the same process as kitchen- mussel bound adhesive paper and same mapei grout- in color frost- as already have on hand

⁃ Put on gold pulls

⁃ Sink- once it arrives we will need to cut the hole & install one hole faucet

⁃ Trying to decide if we buy more plates, silverware, knives – if we do chose the option of renting it out to people— it will be fully ā€œfurnishedā€

⁃ Add gold bar for utensils

⁃ Add & organize food & cooking supplies

The dinning room/ living room-

⁃ Cut butcher block table to size & install

⁃ Lighting!! Pick & buy !?***

⁃ Put backing on bench

⁃ Add wall treatment?!?!? (Unsure)

⁃ Add cushions to bench

⁃ Put in couch

⁃ Find rug

⁃ Decorate

⁃ Add storage baskets/ bins- with dog blankets & toys

⁃ Add blinds & curtains (unsure of rods yet?!?)

Bedroom

⁃ Sharpie shiplap

⁃ 2 gold sconces & hide other cords

⁃ Blinds & shades

⁃ new mattress??**

⁃ New sheets

Bathroom—- while am i procrastinating this?!? Idk!

⁃ new vanity (could keep old idc)

⁃ Paint

⁃ New mirror

⁃ New light fixture

⁃ Rub& buff exterior shower gold

⁃ Stock & Organize bathroom supplies (towels,

Dates of deliveries:

Faucet, pulls, tile ā˜‘ļøā˜‘ļø

Flooring- Feb 7th ā˜‘ļøā˜‘ļø

Couch- Feb 16th

Sink- Feb 28th

Blinds- Feb 20th

I am planning to type up another post about supplies I’m bringing, food, the route we pick! All other details for a different post. But we are about 6 weeks out from leaving— and still not livable— so focusing these next two weeks to make it as finished as possible!!!! I need Ron order everything this week !! šŸ¤ŖšŸ˜…šŸššŸ‘šŸ¼

Top 3 Projects of 2021!!

I know it’s already the First day of February—but I haven’t had time to reflect!! So these, in my opinion, are my fav 3 of the year!!

In no particular order!! šŸ˜āœŒšŸ»

Kitchen —I tiled counter to ceiling, installed new window, reframed and re-dry walled window, made beautiful floating shelves out of scrap weathered wood! They are the floating shelves of my dreams! The tile I am still obsessed with, every day I walk in!! very pleased! But, it was only a half kitchen Reno- there is still the other half to do, sometime!

Before & after— kitchen

Living Room Floor— We installed waterproof laminate flooring in the giant living room!! I removed the rug!! All 1450 square feet of it and the 5,000 staples on the ground. We used @Pergo Northern Blonde Maple Laminate flooring. We bought it from home depot, but special ordered it to the store for picked up.

Matt and I both installed it, we did it in a day and a half- then we needed a couple days off to ice our backs šŸ˜› – but overall it is literally the best improvement. It is the most beautiful flooring!!! Its scratch resistant and truly has been! With dogs that a must have!!!

Before & after— living room!!

Painted tile floor in bathroom- This was a project that I severely underestimated! I just wanted to paint the floor in hopes i would hate the bathroom 10% less, and it turned out flipping stunning!!! If you were to have asked me if I’d ever post my master bath on my ig page, I would have laughed! But now, just by adding the painted floor, shelves I already owned, mirror I bought for a diff location and a clearance vanity—it is one of my top 3 projects of the whole year?!?! So happy, yet so surprised!

Im excited to make new goals & projects in this upcoming year!! But this RV really threw off my 22 project list šŸ˜‚šŸ˜‚ but I love it!!! Next blog will be all about the RVšŸ˜

Thanks for reading!!

Xoxo Lauren

2022 Home DIY Goals

So, with this new fresh year, we have lots of exciting plansšŸ˜ ! Our home is beautiful & I love every single project we have complete. But, there are some little upgrades I’d love to do in a couple spots! I’d love to become more minimalist in our belongings, stay organized in the process of throwing away/ recycling our extra things, as well as lots of personal diy goals listed below🤪

Projects:

ā—¦ Walk in closet

ā—¦ Gold chandelier in living room (will need to rent scaffolding)

ā—¦ Faux brick/ build electric fireplace & mantle in basement

ā—¦ Plan Mud room addition/ save for it

ā—¦ Herringbone floor or design somewhere

ā—¦ Green accent color somewhere

ā—¦ European cottage vibes— everywhere!

ā—¦ Build bookshelf

ā—¦ Redo vinyl paper on countertops

ā—¦ Add curtains to other rooms – rattan blinds & white black out curtains

ā—¦ build Garage lean-to for rental supplies

ā—¦ Clean out decor & sell on ig/fb

ā—¦ Arches bookshelves x2

Personal DIY Goals:

⁃ learn the use pocket holes to build furniture (will practice with bookshelf build)

⁃ want to get really good at using the table saw

⁃ matt got me a scroll saw for chrismtas!! I need to learn how to use it and make some cool signs! (Taking all idea recs!)

Lots of room for improvement with DIY, with life, with my family, with my work! I’m excited to learn and to teach you all some great tips for tackling projects in your own home!! šŸ’“

Painted Tile Floor w/ Rustoleum floor paint

Okay! So I made a list of the things I learned & a nice recap of the process! So let’s start with : Things I’ve learned!!

1. Start the stencil where you will see it the most— ( I should have started at the doorway, not farthest covered corner). This is to make sure that you are starting off straight and level, bc it’s inevitable that you will be off a little in the end.

3. Using a dense roller was 100% much better than the foam brush or paint brushes that I first tried. I think that the grout lines wouldnt have bled much at all if I had used it from the beginning.

4. Waiting in between each stencil would have caused less bleeding also. It was def the way to go, but my Bathroom was way too big for that so it had some paint smudges and bleeding.

5. Taping the stencil in place was great and very helpful

So lets recap!

⁃ I used Rustoleum floor coating paint. I chose the ultra white color as tile and Ice grey as the faux grout color.

⁃ I degreased the floor very well.

⁃ I then painted the floor ice grey first as the base coat- to then paint the tiles on the floor.

⁃ Next the stencil! I really liked the stencil that I bought, but it was definitely tough. I didnt anticipate it to be as much work!! But the white was tough, as it needed two coats. the first coat was a little nerve wracking as it looked terrrible, but I just needed to think of it as primer.

⁃ The bathroom is very large. It would be a lot less labor intensive in a smaller room or bathroom! But I am still very happy I did it!!

⁃ I started in the far corner to make sure it worked well, but once I got the hang of it I should have switched back to the doorway to make sure the most seen part of the floor was level and perfect- instead of ending there and needing to match up everything (which was a challenge)

⁃ Luckily the paint dried pretty fast, so it was easy to do touch ups and conquer a lot of the floor in short time periods.

Overall I am very happy!! I like the color choices! I like that the tiles are white! But it would also look very good if I had done it the opposite way and done grey times with white grout lines. It may have been a lot less work.

And if it hasn’t looked good at all it would have been totally acceptable to paint it all back grey as that looked great too.

Happy I chose to do it! Happy I followed through even when it looked terrible!!

& extra thanks for staying along to see the final product šŸ˜…šŸ¤ŖšŸ˜‚

Do you have tile in your house you would paint??

DIY Painted Tile in Primary Bathroom

Next up!! I am going to be painting our tile floor in the primary (formally stated master bathroom)

I have been wanting to concur this project for a while.

Our primary/master bath was a room I wanted to renovate since we moved in- but for now with our current budget- a temporary fix will have to do! Here is the before pic— (the listing pictures)

A bathroom Reno is expensive and I have lots of plans that I can share in a future blog!!

Recently, the term master bedroom/bathroom has gained some traction as being possibly racially charged.  ā€”they are saying it should be referred to as the primary bedroom/ Primary bathroom- as it could be tied back to a master owning slaves. I will be using primary from now on! 

Have you heard about this argument?? Now that I have heard about this, I have noticed some realtors and home improvement TV channels have changed their terms to primary!

Anyway! I want to paint over our current tile!! We currently have large blue square tiles, I haven’t measured them but they are probably 12×12 with off white/ cream grout. The goal is to paint them and then use a stencil ( that I have already bought) to make a whole new tile pattern!

I got this amazing idea from @sweetbungalow on Instagram. She did a similar thing for her bathroom

Here is my plan—

I’m going to use rustoleum floor coating 2 step process—

1-      Step 1-base coat (color ā€œpear greyā€) and then use color ā€œultra whiteā€ to make the faux tiles and then on top use

2- step 2 as semi-gloss top coat!! It looks like home depot is more likely to carry these things ( I usually shop Lowes but we have a HD near us too)

These are what the prices are looking like for me right now ( these are def. increased since I last looked – of course what isn’t).

Prep- scrub/clean/degrease floor- will use one gallon  ā€œkrud kutterā€ – $14.98

Base coat step 1- for one gallon $57.98 – comes white but tint to pearl grey

Use 2 qts ultra white base to paint over stencil—23.98×2- 47.96

Step 2- top\coat- semi gloss- 4x qts $95.92- I haven’t measured the square footage of the bathroom but I also haven’t been able to find the supplies for a while so I will be ordering these supplies so that I am ready when the time comes.

Online it says that One gallon should cover 400sqft- so I will def measure the sq ft when I get home, and as always plans change, but I have researched a lot- so hopefully its smooth!! ( no pun intended!! )

So all these products are ordered!! From Home Depot & will be here in a week. So beginning of November!! Painted tile here we go!!

Kitchen Island DIY Shiplap

I love shiplap in everyone’s home & I wanted to incorporate it into my kitchen!! So I added it to both sides of my L shaped counter, which I call the island 🤪. I have 4 counter stools on the long side & I thought it needed more character- but very simplešŸ¤—

Here is the before & after!

ļæ¼

It gives it a simple look with slight texture & hopefully it adds a little extra inches to the view of the ā€œheightā€ in the kitchen.

So, on the long end with the stools— I tried to do budget friendly DIY shiplap- I used the table saw and cut down a sheet of bead board. I cut the shiplap boards into 4inches wide strips. I primed/painted the backside. I already had the board so that was free. I planned to use tile spacers that I had bought for the subway tile backsplash . But when I started laying the boards up, it was clear that my table sawing skills were not exceptional. The boards weren’t very straight. So I just eyeballed the gaps. From afar it looks great, but close up you can tell the gaps aren’t exactly identical.

Thankfully, I chose to start behind the stools, so by the time I got to the side you can see the most- I decided to buy precut boards that I have already used! For the breakfast nook bench!

I bought 3 inch wide by 1/2 thick x 36 long .

Steps!!!

1- measure from floor to counter

2- measure boards and mark on either side of board with marker

3- cut boards to size with miter saw

4- prime / paint front & two sides

5- put up in place to visualize and make sure all fit

6- use brad nailer (ours is an air compressor version)

7- fill nail holes with putty

8- sand putty flush when dry

9- repaint— Sherman Williams Snowbound in satin!!!šŸ˜šŸ‘šŸ»

Here is the breakfast nook examplešŸ˜ (this project is from February 2021)

I love the way both of the shiplap projects turned out!! It’s a quick and easy DIY! Let me know if you give it a shot in your home!!!

Thanks!!

Lauren āœŒšŸ»šŸ› šŸ’“

DIY Kitchen Reno- Floating Shelves/Tile/ Window

Three main parts of the phase 1 Reno—

—New window

— Subwaytile backsplash

— Floating Shelves x2

Here is the progression of the Phase 1

  • – remove 5 cabinets from wall 
  • – removal of old tile backsplash/border- this was also removal of the drywall attached to the tile 
  • – old window removal 
  • – cutting out old window framing to make it larger (took a couple tries)
  • – using the new lumbar 2x6s to create the new framing/ making sure level 
  • –  inserting new window  
  • – fixing drywall all around window and along removed parts 
  • -putting up the ultrashelf 2x brackets (studlock standard floating shelf 58 inch) with 6 inch rod length
  • – starting to tile— using musclebound adhesive paper and individual 3×6 subway tiles
  • – tiled whole wall
  • – grouted wall with frost mapei unsanded grout 
  • – added small white window trim (bc my tiling wasn’t exact) 
  • -installed new sink faucet (Black)

SHELVES-

  • – started sanding wood for shelves 
  • – cut large pieces of wood to size— ended up being 64inches each 
  • -first used planer to take off the grey weathered top coat 
  • -then sanded for actual hours— all 4 sides of both pieces 
  • – I found that the grey was deep into the wood and I couldn’t sand out, so I decided to add a wood front as a veneer. 
  • -Cut down the 1×2 to shelf size, attached with wood glue, clamps and finishing nails 
  • -used DAP wood filler to fill in the large creases
  • – sanded it all smooth
  • -stained with 3x colors— Minwax  (natural, ipswch pine,
  • – sealed with satin polyurethane 
  • – used the ultra shelf tools to set up the back side of wood for the bracket holes
  • -used router to make large indentation in back of shelf, used the jig to drill holes 
  • – went inside to see if shelf fit, found we didn’t drill deep enough so brough it back out and drilled deeper! 
  • – came in, got shelf in brackets
  • – decorated
  • – added sconces 
  • -cleaned kitchen 
  • _______________________

FINISHED!! 

Supplies/Expenses –

  • 8– Spray foam (4×2)
  • 3– DAP Caulk
  • 200– Lumber— 2x6x8 – rk miles
  • 48– Tile x4 boxes ($0.15 x 80 tiles per box= $12 )
  • 50– Mapei Frost grout
  • 25— blue hawk Tile cutter
  • 128– Mussel bound tile stick x 4 ($32 x4)
  • 50—Shelf wood
  • 180- Shelf brackets- ($90/ 58 inch bracket)
  • 15 – routing jig 
  • 15- auger bit 
  • 20- router bit 
  • 5- drilling jig 
  • 150—Router-
  • 50—Sink faucet
  • 56- Sconces—
  • 28- flush led ceiling light
  • _____________________________________

Total =$ 1,046

Decor

  • 210- Smeg coffee maker
  • 129—New rug (all collective)
  • 12- Plate holders
  • 30- Cookbook stand
  • 6- Glass bowls
  • 6- Glass cappuccino cups
  • 15- Paper towel holder
  • 39- toaster
  • 5- Butter holder
  • 29- Ceramic bowls
  • 75- Opal house rattan stool
  • _________________________________________

Decor Total=$ 544

Overall kitchen total= $2,134

I dont set budgets before the project starts. It is something that I am working on, as it shelfpul to now before what the goal is. I havent done it yet, but i tend to make the project the best I can with the best. but also cheapest supplies. that being said– There were definitely some splurges in the decor budget section ( i didn’t need a smeg coffee maker or the rattan stool, but i am happy i got both).

Main takeaways–

It could have been cheaper, however I am happy with all of the supplies, the quality, and the choices I made.

I am happy that I chose the ultrashelf brackets and bought the tools they recommended for the drilling and routing parts.

I am shocked that I was able to turn the dark grey piece of wood that we found into my dream shelves.

I am blessed that my husband was able and willing to help me in all the phases of this project, but also gave me the freedom to make the design decisions, spend the money on the reno and be supportive in this DIY adventure ( by being supportive it also means he tells me when something is to expensive/out of budget or unrealistic- something that i respect and appreciate).

Thanks for reading!! & being patient in my DIY journey ā¤

xoxo Lauren

My Top 5 Favorite House Plants šŸŖ“🌿

As you all know, I love plants! I find that using plants to decorate my home is the perfect final touch to any space. It brings brightness, color & life to your home.

One of my most frequently asked questions in my DMs is ā€œwhat are my favorite & easiest plants to keep alive?ā€. So I’ll spill all my fav plant details !

My Top 5 Easiest Plants-🌿🪓🌿

1- Snake plant

2- Monstera

3- BOP (birds of paradise)

4- Pothos

5- Philodendrons

1.) Snake— by far the number 1 easiest plant I have ever owned. I have about 7 and I have only killed one and it was really old (5+ years) , so I am banking on that being the reason. It says to only water every 2-3 weeks, however I still water them about once a week but only very small amounts. I have most of mine in a room that gets a lot of sun so they are more likely to dry out. It does survive in both very light and relatively dark rooms. I propagated one of the plants about 6 months ago and have yet to plant it, but the roots grew finally after about 3 months!! I placed it in a vase that was dark so that it mimicked dirt more thank glass vase would & it worked perfectly. I will be planting those in the coming weeks!

2.) Monstera – I really enjoy this plant, it is beautiful, the shapes of the leaves, the & color is beautiful. The one I bought is rather large (I think it was a 10inch pot) and fits perfectly into my favorite seagrass baskets. It is never droopy, never had a brown leaf, regrows another leaf about once a month. My plant recently had a node that started growing large and so in my research I found that it needed to be propagated. I made a reel of the process! The biggest rule of propagation is Always cut below the node!!so we will wait about 3 weeks to see how the roots grow, but I ended up with about 4 cuttings with nodes so that great!! I will be my first mostera propagation. Love love this plantšŸ˜

3.) BOP— Bird of paradise🌿-These plants are beautiful! I love the formation of the leaves and the fullness and height that they bring. Obviously I like large plants as they are just stunning, but also my living room is huge and the large plants fill it very nicely with the tall ceilings and long narrow room. They do well with weekly watering and I bought all of mine at the same time. About 6 months ago and since each have grown one new leaf! Each plant was a little different in shape but the new leaf grows at the top which gives it new height. The leave should Ravel so beautifully that the green color is ombrĆ©

4.) Pothos— These are my OG plants, they are easy to find, beautiful, often have vines and propagate really well. I have a bit of a love hate relationship—I love how they look, but they aren’t as easy to keep alive as many say. They really do need a lot of light and I tend to love them in locations where I can hang them or sit on a shelf to decorate a corner and they die. I still buy them, I have so so many I can’t even count. I will always have them and love them, but it’s inevitable to believe they will all stay alive.

5- Philodendron—I recently got into these beautiful plants! I love when plans grow quickly and have long vines so I researched and found that the heart leaf philos and another type called philo brasil are one of the fastest going house plants! I bought two different types- both from amazon ( I will provide company below). I have had both for about 6 months and am very pleased. They haven’t grown extremely fast, but noticeably well since I bought them. They don’t wilt or get upset if don’t get water every 7 days like some.

My watering routine is once per week- I try for every Sunday, but I usually go around mid-week and give a little extra water to those feisty ones who dramatically wilt, but perk right up with just a little water!

My Plant Tips🪓

– Plants are going to die, its inevitable! Throw it away and buy a new one!

– Watering schedules are great for the plant and even better for you—don’t over water and watch the plants through the week to see if they need just a little top off.

– Don’t take them out of their nursey pot for a while! Especially not right after bringing them home. You can place them into other pots or baskets! Almost every single one of my plants is still in nursey pot but in a basket to give it more of a boho vibe.

– Be aware that plants carry bugs, so when I bring plants home from lowes/Home depot/ nursey I separate them fro a couple weeks- like keep them about 6 feet (lol covid joke)

⁃ If the plant isn’t doing well first try water and wait couple days, next it might need to be aerated so I use a chop stick to dig into rooms a bit and then do those don’t work I change locations and try again. If not change and starts to die more I chuck it & go plant shopping!! šŸ˜šŸŒæšŸ˜œ

Thanks for reading!! See you on Monday with the master bedroom blog!! šŸ˜šŸŒæāœŒšŸ»

Kitchen Phase 1

I have loved floating shelves for years and I have always had the goal that my dream kitchen would have of two beautiful light wood floating shelves. These shelves above are from the beautiful kitchen of @betterthanthethreeofus & i have gotten serious inspo from her! I am doing rectangular subway tiles, but on her blog she gives amazing details about her process.

I love when floating shelves can be stylish and functional- so that is the goal! We recently got married and are lucky enough to have matching plates and bowl sets. For cups we also only use mason jars and therefore the shelves can hopefully be easy to style, but also beautifully functional. We did remove a total of 5 cabinets that we used daily, but I am confident that the shelves will work well for kitchen organization.

My goal is always for minimal, neutral boho vibes – so I am going to try really hard to keep the shelves minimal and not cluttered. I’m excited to learn to style them and share with you all the tips!

Phase 1 Kitchen goals—

  • Bigger window
  • Tile the backsplash/walls that goes up to ceiling
  • 2 floating open shelves
  • Sand, stain, and hang up shelves
  • Reorganize kitchen cabinets/ pantry
  • Draw/plan layout for mud room addition/ open concept
  • Get estimate for mudroom
  • Budget/research new appliances – leaning towards CafĆ©

As I have mentioned before there are many phases that will go into our kitchen! I wanted to tackle the floating shelves first and learning to tile! It was the most budget friendly option and was currently feasible for us financially. I picked a cheaper tile option with single pieces 9the ones that come in sheets re more expensive because they are easier haha). We found wood at a sawmill that was weathered and the company was happy to get rid of it ($50 as opposed to 640 for one shelf on the leading websites). I chose to spend the most money on lumber for the window framing and the brackets for the shelf.
Once phase one of the kitchen is done I will post more4 about the prices for each part! And the brands I used!

I feel good about the plan, I was a little overwhelmed a couple weeks ago- the details are more clear to me now, so feeling better.
Overall, researching and making the kitchen plans myself is fun and mental challenge -which I enjoy.

Thanks for reading!
Lets get this kitchen some subway tile & floating shelves!!!

Xoxo Lauren