Laundry / Guest Bath RefreshđŸ€©âœŒđŸ»

Can you guess the quickest project to date?? Our Full guest bath/laundry room!!

I was so excited to update the guest bathroom and laundry room in hopes it would inspire me to clean & do laundry more (wishful thinking- I know) !! 😂

It is a room I am constantly in throughout the day! It holds the washer & dryer, it has the cleaning supplies closet, linen closet, med cabinet, it is the only bathroom on the main floor & right next to the kitchen!

It was also by far the most budget friendly project I have done so far. Which I am hoping will start to be more common now that we have a lot of the necessary project supplies- tools, paint colors, paint supplies & we seem to have a pretty good stock pile of wood. Let me tell you- lumber is so expensive right now! I’m sure you have heard this, but it definitely effects project budgets & even the decision to do a project. (it is almost 2x as much just for the same pieces of wood—specifically 2x4s).

Anyway— I posted on Instagram the cost breakdown of the bathroom so ill put it up here along with the supplies we used for this project. I kind of like sharing at the beginning to help explain the layout & details.

Cost breakdown-

$74- 3 globe light (amazon)

$60- tjmaxx circle mirror

$20- tjmaxx jute rug

$20- 16 brackets (only used 2) Amazon

$10- towel holder- aubachaun hardware

$25- one sheet of white primed bead board (RK miles)

$10- 1x4x10 the trim/boarder piece

$ 30- 3x black framed pictures- amazon

____________________

$249

Tools/alreay had supplies-

Dewalt drill

Craftsman brad nailer with compressor

Level

Stud finder

Paint – SW marshmallow (white) and Benjamin Moore – Stonington grey/ paint brushes x2 and paint rollers x2

Spray paint- rustolemum 2x that bonds to metal and plastic in semi-gloss

Caulk and caulk gun (already had)

4 black pulls for cabinets (Lowe’s) I bought a couple months ago for this project

Frog tape (my fav everrrrrr— doesn’t rip off paint from drywall ever!!)

Décor- I shopped my home for all of the decor!!

Steps-

1-      Before we bought anything I prepped the room with the supplies I had. So I painted the vanity with SW marshmallow, put on the black pulls, prepared and spray painted the faucet, gathered dĂ©cor, ordered the picture frames, and finalized the design plan.

2-      Next, went wood shopping—this was my first time buying bead board, but we went to our local store (RK Miles) over the larger box store- usually Lowes. We are finding that it is a little cheaper and when we have the time it is better to support local.

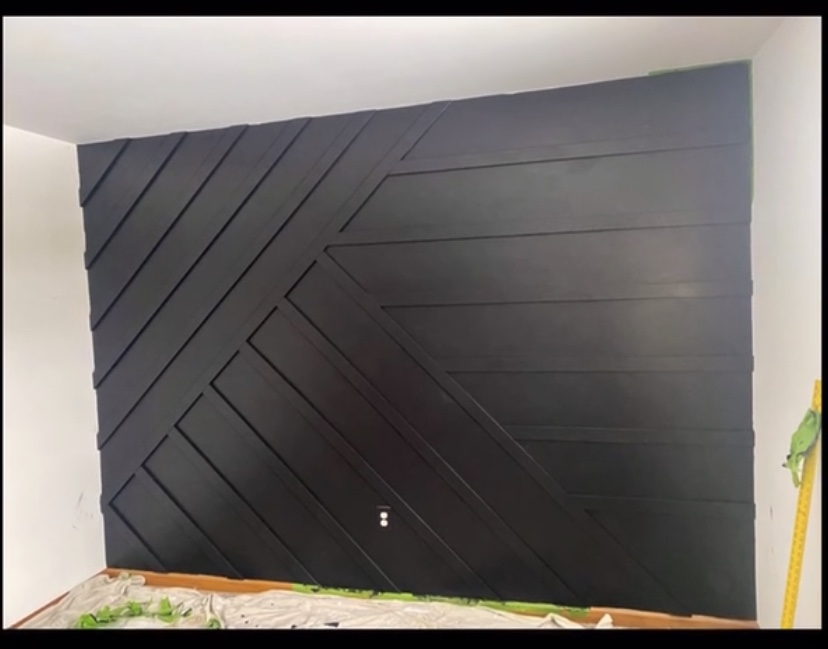
3-      Measured the wall, decided where the bead board was going to go—I wanted the trim piece at the top of bead board to be directly in the center of the circle mirror. So we put up the globe light, matt held up the mirror and decided where the halfway mark was. The top trim piece is 1×4 (which is actually only 3.75 inches) and the measured down to the ground to determine the height of the bead board. We drew guide lines on the wall.

4-      I painted the grey accent color on the wall prior to the bead board so I didn’t have to tape.

5-      Started using the brad nailer to attach the bead board to the studs in the walls. (use stud finder—but just a key fact—studs are almost always 16 inches apart from each other along every wall.

6-      We didn’t necessarily match up the bead board lines, I used caulk to fill the lines and it made it look more cohesive. We ended up using only one sheet, but bought 4 (matt’s math was off for once and I only bragged a tiny bit 😉 ).

7-      Once it was all up, I got the paint out—then quickly placed it on the (running) washer, turned away to grab the brush and the paint was all over the ground. See below pic. Cleaned that up & still used the paint after scrapping it off the floor- & still got a great finish ;p

8-      Put up the mirror!!

9-      Put up the globe light!!

10-   Bought the towel holder, decorated and cleaned up the inevitable project crap & sawdust that always happens.

11-   Waited very impatiently for like a week for the my frames and then DIYed some art – after work so like 9pm

12-   Took reveal pictures!! I try to take them in the morning as it’s more likely to be sunny! Natural Lighting in pictures is hard!! Sun it’s very helpful but also blue sky makes rooms brighter & the whites pop!! I can show u examples in my stories later if you’re interested!! Sunlight & blue sky are always the goal for me for interior pictures! (Not that that’s easy in Vermont winters— ever 😂 )

Overall it was a nice update to this space, it’s really nice to have cheaper and easy projects in between the challenging and soul sucking ones. The basement was A LOT of painting for me— I was really burnt out from it & I look a month off and then chose this quickie which was a great choice.

Projects are hard- physically & mentally but I absolutely love the feeling of being done. It also comes with a great sense of accomplishment & confidence.

Thanks so much for reading & supporting me💓

Lauren🌿💓

🌿Boho Accent Wall Office đŸŒż

Here is the long awaited black accent wall office blog!!

Accent walls have really been trending in 2020-21 and I have been loving them!! I was so inspired to create a moody accent wall- so I found lots of inspo pics & created my own design.

They go by a lot of different names: accent walls, wall treatments, feature wall and others. I looked at a lot of inspiration pictures and projects that people had done & I decided a black moody accent wall would be cool. I found a room in my house that would fit the moody/dark feature wall. I chose a guest bedroom- It worked well because the rest of the walls were bright white & the natural light in the room is great. It is an east facing window so sunrises and morning light are exceptional.

Here is the before:

Project steps!!

1- First, I found an inspiration picture that I loved . The circled one is what I chose

— I didn’t copy the exact shape/design or MDF placements, but I used it as a great guide.

2- I made a list of products I needed at Lowe’s & list of things I already had.

Lowe’s-

⁃ MDF boards (I bought white primed 2.5 inch x 8 ft long boards) I believe we used about 15 but bought 20.

⁃ 8 boards 2x4x10 to make the desk top

Already had-

⁃ SW Black paint

⁃ Painters tape— I use the green “frog tape” it truly doesn’t rip the paint off

⁃ Brad nailer we use an air compressor attatchment which works well!!

⁃ Step ladder

⁃ Measuring tape

⁃ Level (importanttttt!!!)

⁃ Stud finder

3- I decided on my layout I will add the drawing here. For The room is 8ft tall by 11ft long.

4- We then marked the studs with pencil (drew lines all the way down the wall from ceiling to floor to make sure to put the brad nails into the studs.

5- Then Split it into three sections- each with a diff angle.

First section we added 6 diagonally left to right upward

Second 7 boards – downward leg to right

Third is 7 board -straight/ horizontal

6- So we went section by section— 45 degree angle for the wall cuts. Measured 10.5 inches in between every board and started from the top left hand corner. The measurements went a tiny bit funky as we went down , but on average they are each 10.5 inches apart. Used a measuring tape to mark 10.5 down from each board. Used a level to draw the line. Was very helpful to have two people drawing the line and making sure the measurement was the perfect length so the cut was flush against the ceiling and the wall.

7- I painted the first section of Mdf boards black before we hung them. Then I found it was more time consuming so we just cut them all and used the brad nailer on the studs which we pre lined with pencil before we started.

8- used the Sherwin Williams in satin

9- Light fixture— I did a basket light hack for the rattan chandelier for hen office. I used a basket that had a rounded shape from target. I searched for a basket that didn’t have a square bottom or firm 90 degree angle so that I could hang it upside down and put the pendant light sting in it.

10- DIY BUTCHER BLOCK- I love love anythjng and everything butcher block. Matt found a way to make it cheaper than buying a countertop butcher block slab- which they do have at Lowe’s but we were trying for the smallest budget. So he took each 2×4 and on the table saw he ripped off about 0.25 (1/4th) inch off each side (to cut off the rounded edge). So each board ended up being a little less than 3 inches wide. He then took two and used wood glue to attach them. He used clamps on each end to press them together. He did sets of 2 and then when they were dry he clamped the sets together overall gluing all 8 together.

11-Once that was finished and dry he and I both sanded them down for a smoother surface.

12 – We then filled the cracks and holes with blonde minwax woody putty. Let that dry and sanded again with finer sandpaper.

13 – I used two different stains (my fav combo!! )

First I use minwax Ipswich Pine and then wipe/ smudge off with paper towel. Next before is dries I add minwax natural stain and then wipe off.

14- once again is dry I used Minwax oil based glossy polyurethane. I did three coats and lightly sanded in between each coat!!

The oil based took a bit to dry and set. So we waited a full 24 hours to bring it in the house, and then another 12 before I put anything on top of it. I have wised both water based and oil based polyurethane and the oil is by far smoother and a better finish. I will be using that from now on.

Finishing touches!!

15- I put together the two furniture draw sets. Then we placed the desk top on it. The rug came in, put the chair together. Hung the gallery wall, I decorated and hung the light fixture. Finally we hung the beautiful macrame wall hanging for the finishing touch & then I posted the reveal!!! Here are some pictures!! 😍😍

Who doesn’t love an amazing before & after— 😍🌿💓

Cost breakdown for office—

$95 =Mdf boards (Lowe’s) 6.29 x15=

$85 =2x4x10 for desk top- = $10.58×8

$218 = 2 ikea dupe draw sets 2x $109 =

$230 = Macramix tapestry (I bought for my wedding but hung here) =

$70 mis century modern chair

$25 burnt orange blanket

$55= gallery wall-12×12 with 9 frames

$20= target basket (for light fixture)

$15= pendant light appliance for light fixture

$100- Wayfair cosmo Collab rug

SW Paint- already had

__________________________________

Total= $925

All pieces of furniture will be used and moved to any room in the house!! The room can easily be made back into a guest bedroom, nursery, or anything we could need the the future. The color can be changed easily, the room can and will take on many forms in the coming years- but for now it is such an incredible room that gives me the best vibes of any room. 😍🌿💓

Thanks so much for reading & supporting me!! Leave me a like if you can!

Xoxo Lauren