Welcome back to the blog!! Let’s chat 2021 project/goals!
I know we are 5 months in- but I’m feeling like my life is a bit more pulled together 😂
Here we go!
This year is a very exciting year for me and my husband. It will mark out 4th year living together, but first year married!! It is a year that we will be trying (really hard) to save money, but also do budget friendly home improvement projects!! Saving money was our main goal for the year and slowly but surely it’s something me more so than him, are working on!!
In the last two projects blogs I have shared the cost breakdown & many of you have liked that. So I will continue to be open & honest about the financial side of the diy projects that we decide to do.
So I made this list at the end of 2020 and have added a couple projects as the year has gone on. this is the dream/goal list! They are not all happening, but things I am looking into/ planning/ budgeting for.
◦ Basement electric fireplace +mantle
◦ Build Porch couch/swing
◦ New/ larger kitchen window
◦ Kitchen subway tile backsplash (only on half- to the right of window
◦ 2 floating shelves in kitchen in place of 3 cabinets
◦ Kitchen- faux marble epoxy counter tops
◦ Living room chandelier
◦ Master bedroom rattan shades and curtains
◦ Basement bedroom- new bed and slat wall
◦ New front door with side lights/take out closet
◦ DIY large mirror black framed mirror
◦ Get mudroom estimate/consult
◦ Floating shelves basement (1x10x 10 x 2) 11ft 7 inches long wall (already purchased wood)
-Build towel/ bathroom organization unit
2022
◦ Mud room addition
◦ Knock out wall in kitchen/ remove shower / relocate toilet + laundry
◦ Add island
-start building/create master closet – built in units
Already accomplished—
✓ Living room floor- vinyl plank
✓ Update laundry room/bathroom
✓ Basement paint/decorate
✓ Office update/ feature wall/ desk windows
Who has questions!? Who wants to see vision boards??
I want to tackle tile!! And I’ve been so I intrigued by subway time for a while. I haven’t decided when exactly or how or budget or anything— but I know I’d love to attempt a back splash / tile the kitchen walls behind 2 floating shelves.
I will make a separate blog about this including details, prices, my goals and or practicality of the project!!
Remember these are goal projects!! Not exactly reality 🤪 (I’m mostly talking to myself)
Okay y’all!! Let’s chat about the breakfast nook I created!! I wanted to add a large L shaped booth in the corner of our open concept kitchen/dinning room. I wanted there to be more room to sit and move in the space surrounding the table.
My Goals For The Space-
Create booth seating- along wall in an L shape that would fit 4-5 people
long/big farmhouse table that can fit lots of plates/food/people comfortably
change the light fixture to two pendant lights
white/wood boho tones was the goal
have more room to walk and move in the shared space around the table.
Nook Steps-
Step 1- first we did some drywall patching. The L shape I had envisioned included filling in 2 places with drywall. The stairs into the second story were hollow as well as a little crawl space we used to hold the dog food. We covered both of those holes with drywall. This was the first project that I did a lot of the drywall myself. I actually found it rather fun. It is definitely a good project for beginner diy’ers because you sand off the excess and all mistakes are easily fixable!!
Step 2- I drew out the design and measurements of the space while the drywall was drying. Next, we planned and calculate how much wood we would need- how many 2x4s, edge glued pieces and smaller trim i was going to use for board and batten (B&B). Next, went to Lowe’s and bought the wood.
Step 3- We started building the frame. The frame was made out of 2x4s we used pocket holes with screws to attach them all together. Pocket holes are something that I am constantly learning more about and something I am determined to solo master this year.
Step 4- Once the frame was built Matt started on the back of the boothseat- where you would lean back on. I was going to make it a 90 degree angle bc angles are hard, but he was determined to make it more gradual. He made the cuts for the 2x4s attaching to the seat at a 5 degree angle. That way when we laid the pieces of wood across to make the back it would be more comfortable to sit. It was rather complicated and didn’t go as smooth as we both wanted. It caused the most stress of the project and I think its important to acknowledge that all of our project are challenging. There comes a point where frustration takes over and either him or I quit for a bit (sometimes hours/days… it’s usually him- but occasionally me :p). Overall, he figured out the angle and we attached the pieces of wood.
Step 5- For the seat portion of the booth we got “edge glued” pieces of wood they were great quality, pre-sanded and glued together boards- obviously you have to look closely and make sure not too warped but I like this option from Lowe’s a lot.
Step 6- Once the seat was made and the back of the seat were set- I painted. I painted part of the back white and the other part of it black to see which color I would like better. I didn’t decide, but I started the board and batten on the backside of the bench. I used a top and bottom boarder piece and then added a vertical board every 7 inches. Ill post the picture below.
I did not like the board and batten and I painted it all black hoping it would make it better. It didn’t. So I painted it white. I still didn’t like it. Next, I tried to paint a pattern on the board and batten. I did like an arrow shape where I dipped the end of a sponge into the paint and dabbed it on looking like a ^^. I got my inspo from people who DIY their own wallpaper with patterns. But mine did not turn out acceptable lol.
So finally I pried all the boards all off.
Step 7-After all that- I hated the black and the pattern so I went back to Lowes and bought more of the board and batten boards- I decided to vertically ship lap the booth bench. They didn’t have enough of the same thickness (I think they were 3 inches wide) so I bought a couple different widths (1.5, 2in and 3in wide). I brought them home. Painted them all white – Sherman Williams “marshmallow” and then laid them all out with the different thicknesses alternating. Used the air compressor brad nailer (my favorite tool we have invested in for any and all projects!!!).
Nailed them all in. Filled holes with wood filler. Did a final coat of paint.
Step 8- For the wooden seat and bottom. Ultimately I wanted it all to be wood, like a wooden bench. Originally I wanted to add hinges and add storage in the seats but that didn’t end up happening. So it is a wooden box but with only two sides. The bottom is not enclosed and the back side it also open- it is facing the back new drywall I added so its ok. Wooden stain steps:
Stained with minwax natural x2 coats
Polyurethanes with minwax glossy x4
Didn’t like the stain color as it didn’t match the table I refinished form Facebook marketplace.
I didn’t want to sand down the bench top (usually what you have to do after you use polyurethane) so I did RESEARCH
I found out (on the internet) that you can mmix stain and polyurethane together in the same bowl if you want a stain overtop of polyurethane. So that’s what I did
I mixed the minwax Ipswich pine together with the glossy polyurethane it was s thick gooey mess, but I brushed it on (only) the top of the bench top so that it was darker and matched relatable better. It took a while to dry, but ultimately it dried well and they matched SO WELL.
That is a hack I am super happy to have found bc it would have been a disaster to sand all my coats off hahaha
Step 9- Lastly, we put a 1×6 on the top to create a shelf and under that we put small quarter round that originally we bought for another Reno project. We nailed both those in, painted it and it was looking crisp 🙂
Step 10- Called my electrician friend, got the two boho pendant lights hung over the table. Step 11- Decorated the nook with art, plants and candle sticks—all of my go to décor pieces. I really often rotate pieces that I am styling along to each different room and project I am working on. You will see similar and familiar pieces in all my pictures as I style them similarly!! I bring books, vases, plants and all sorts of my boho décor to all rooms.
Then got to enjoy our new space!! It was right in the smack dab middle of COVID so I invited over my BFF for a cute dinner date! Since we built it we have used it frequently for family gatherings, dinner dates and projects 😛 ! I still love how it looks, love the colors, love the ship-lap, love the fb marketplace table and chairs and I am able to switch out the decor on the shelf very frequently- for when i get bored (very often if you couldn’t tell already!!)
Thanks for reading!! So appreciate your love & support of our DIY projects! ❤
Can you guess the quickest project to date?? Our Full guest bath/laundry room!!
I was so excited to update the guest bathroom and laundry room in hopes it would inspire me to clean & do laundry more (wishful thinking- I know) !! 😂
It is a room I am constantly in throughout the day! It holds the washer & dryer, it has the cleaning supplies closet, linen closet, med cabinet, it is the only bathroom on the main floor & right next to the kitchen!
It was also by far the most budget friendly project I have done so far. Which I am hoping will start to be more common now that we have a lot of the necessary project supplies- tools, paint colors, paint supplies & we seem to have a pretty good stock pile of wood. Let me tell you- lumber is so expensive right now! I’m sure you have heard this, but it definitely effects project budgets & even the decision to do a project. (it is almost 2x as much just for the same pieces of wood—specifically 2x4s).
Anyway— I posted on Instagram the cost breakdown of the bathroom so ill put it up here along with the supplies we used for this project. I kind of like sharing at the beginning to help explain the layout & details.
Cost breakdown-
$74- 3 globe light (amazon)
$60- tjmaxx circle mirror
$20- tjmaxx jute rug
$20- 16 brackets (only used 2) Amazon
$10- towel holder- aubachaun hardware
$25- one sheet of white primed bead board (RK miles)
$10- 1x4x10 the trim/boarder piece
$ 30- 3x black framed pictures- amazon
____________________
$249
Tools/alreay had supplies-
Dewalt drill
Craftsman brad nailer with compressor
Level
Stud finder
Paint – SW marshmallow (white) and Benjamin Moore – Stonington grey/ paint brushes x2 and paint rollers x2
Spray paint- rustolemum 2x that bonds to metal and plastic in semi-gloss
Caulk and caulk gun (already had)
4 black pulls for cabinets (Lowe’s) I bought a couple months ago for this project
Frog tape (my fav everrrrrr— doesn’t rip off paint from drywall ever!!)
Décor- I shopped my home for all of the decor!!
Steps-
1- Before we bought anything I prepped the room with the supplies I had. So I painted the vanity with SW marshmallow, put on the black pulls, prepared and spray painted the faucet, gathered décor, ordered the picture frames, and finalized the design plan.
2- Next, went wood shopping—this was my first time buying bead board, but we went to our local store (RK Miles) over the larger box store- usually Lowes. We are finding that it is a little cheaper and when we have the time it is better to support local.
3- Measured the wall, decided where the bead board was going to go—I wanted the trim piece at the top of bead board to be directly in the center of the circle mirror. So we put up the globe light, matt held up the mirror and decided where the halfway mark was. The top trim piece is 1×4 (which is actually only 3.75 inches) and the measured down to the ground to determine the height of the bead board. We drew guide lines on the wall.
4- I painted the grey accent color on the wall prior to the bead board so I didn’t have to tape.
5- Started using the brad nailer to attach the bead board to the studs in the walls. (use stud finder—but just a key fact—studs are almost always 16 inches apart from each other along every wall.
6- We didn’t necessarily match up the bead board lines, I used caulk to fill the lines and it made it look more cohesive. We ended up using only one sheet, but bought 4 (matt’s math was off for once and I only bragged a tiny bit 😉 ).
7- Once it was all up, I got the paint out—then quickly placed it on the (running) washer, turned away to grab the brush and the paint was all over the ground. See below pic. Cleaned that up & still used the paint after scrapping it off the floor- & still got a great finish ;p
8- Put up the mirror!!
9- Put up the globe light!!
10- Bought the towel holder, decorated and cleaned up the inevitable project crap & sawdust that always happens.
11- Waited very impatiently for like a week for the my frames and then DIYed some art – after work so like 9pm
12- Took reveal pictures!! I try to take them in the morning as it’s more likely to be sunny! Natural Lighting in pictures is hard!! Sun it’s very helpful but also blue sky makes rooms brighter & the whites pop!! I can show u examples in my stories later if you’re interested!! Sunlight & blue sky are always the goal for me for interior pictures! (Not that that’s easy in Vermont winters— ever 😂 )
Overall it was a nice update to this space, it’s really nice to have cheaper and easy projects in between the challenging and soul sucking ones. The basement was A LOT of painting for me— I was really burnt out from it & I look a month off and then chose this quickie which was a great choice.
Projects are hard- physically & mentally but I absolutely love the feeling of being done. It also comes with a great sense of accomplishment & confidence.
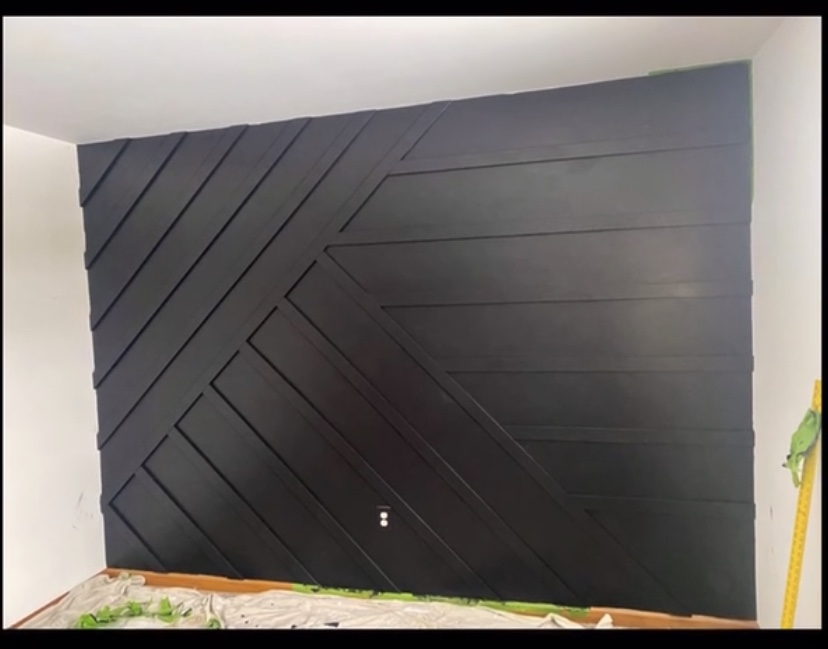
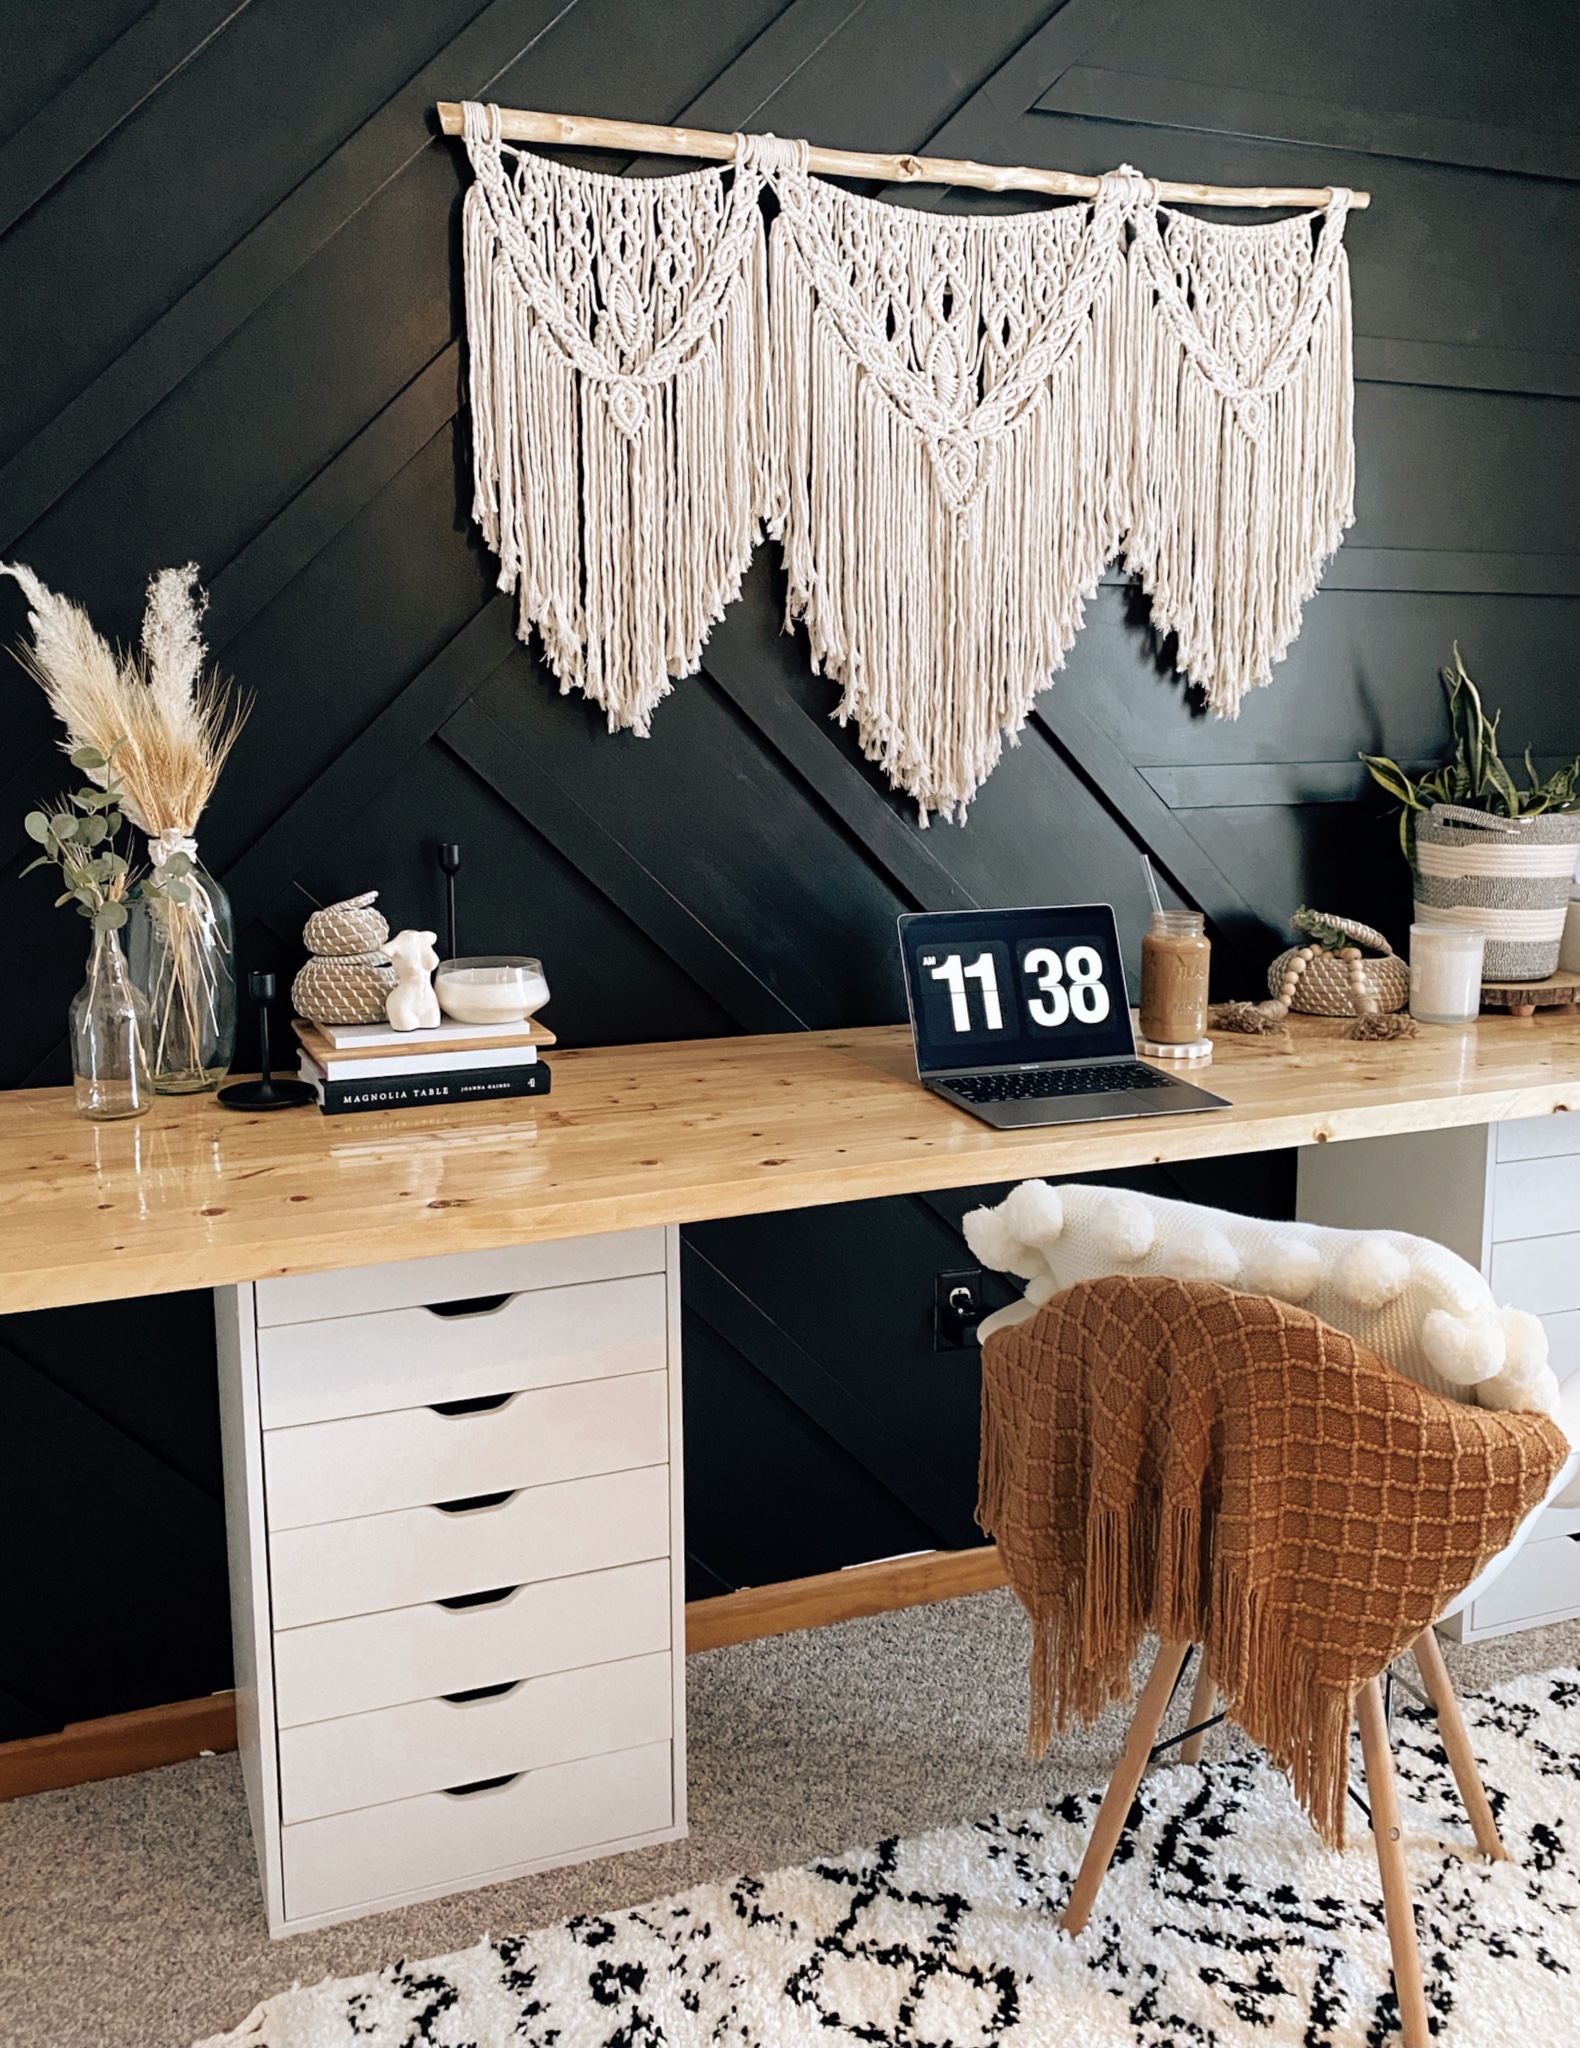
Here is the long awaited black accent wall office blog!!
Accent walls have really been trending in 2020-21 and I have been loving them!! I was so inspired to create a moody accent wall- so I found lots of inspo pics & created my own design.
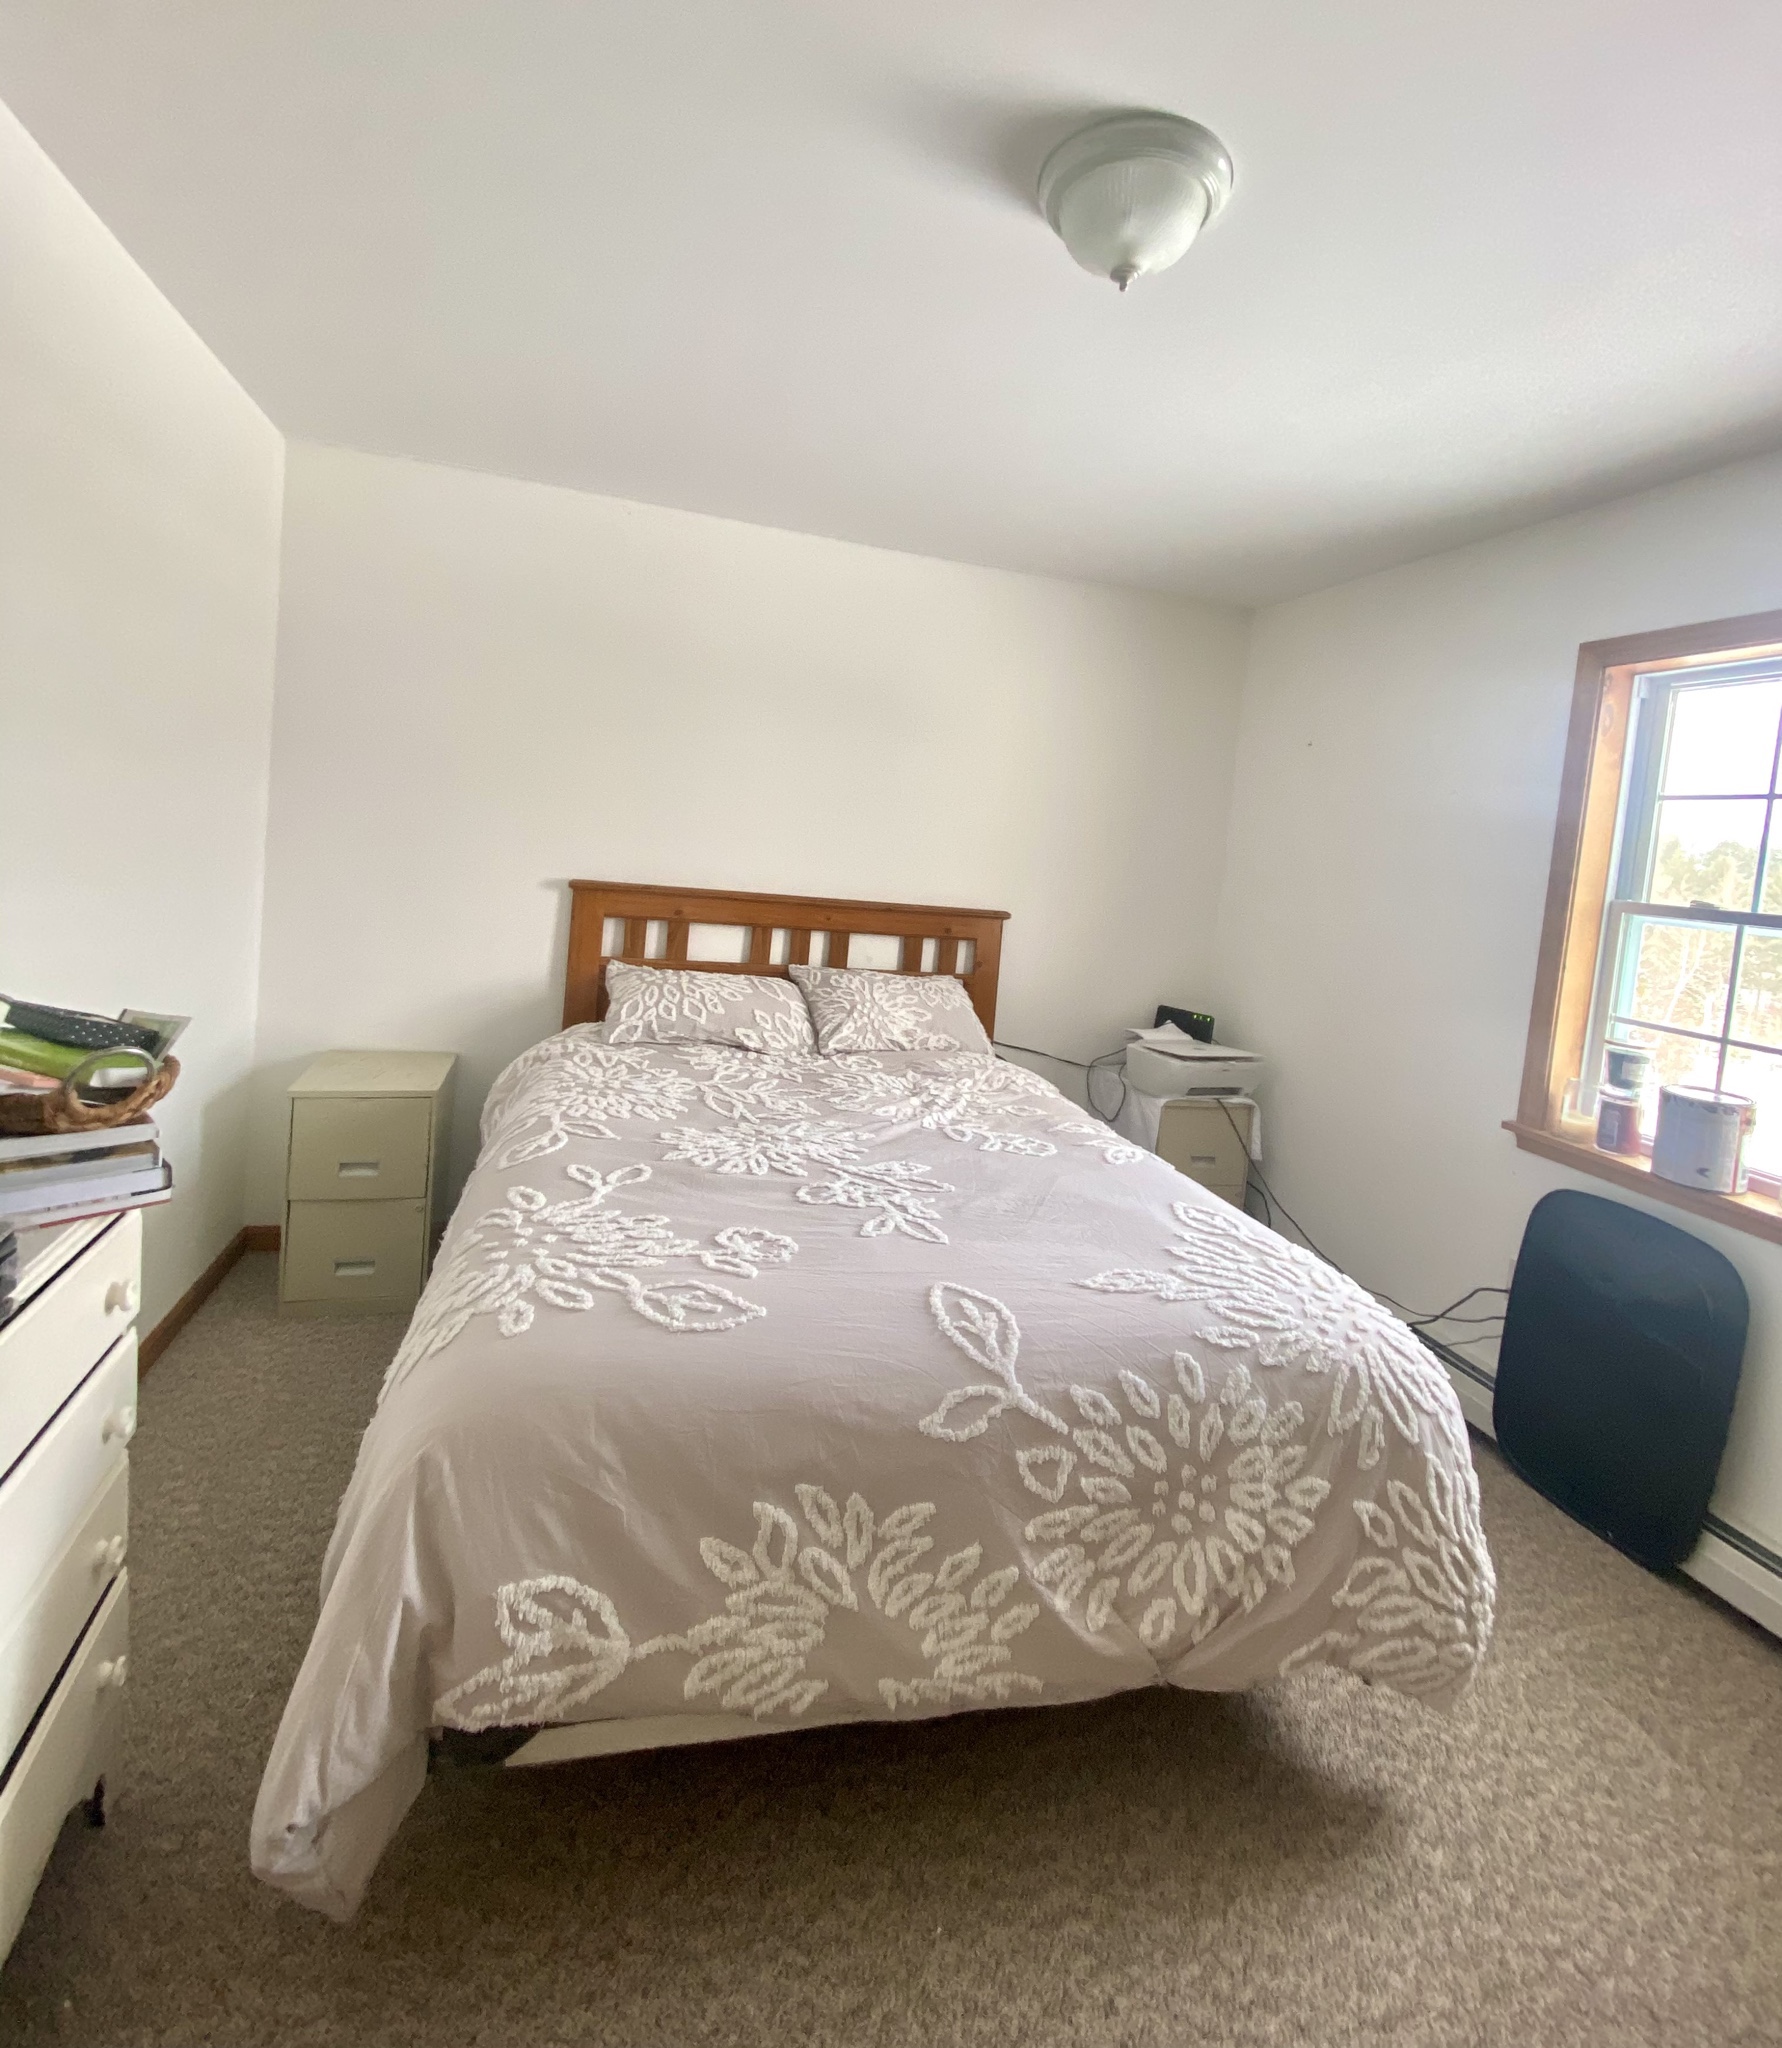
They go by a lot of different names: accent walls, wall treatments, feature wall and others. I looked at a lot of inspiration pictures and projects that people had done & I decided a black moody accent wall would be cool. I found a room in my house that would fit the moody/dark feature wall. I chose a guest bedroom- It worked well because the rest of the walls were bright white & the natural light in the room is great. It is an east facing window so sunrises and morning light are exceptional.
Here is the before:
Project steps!!
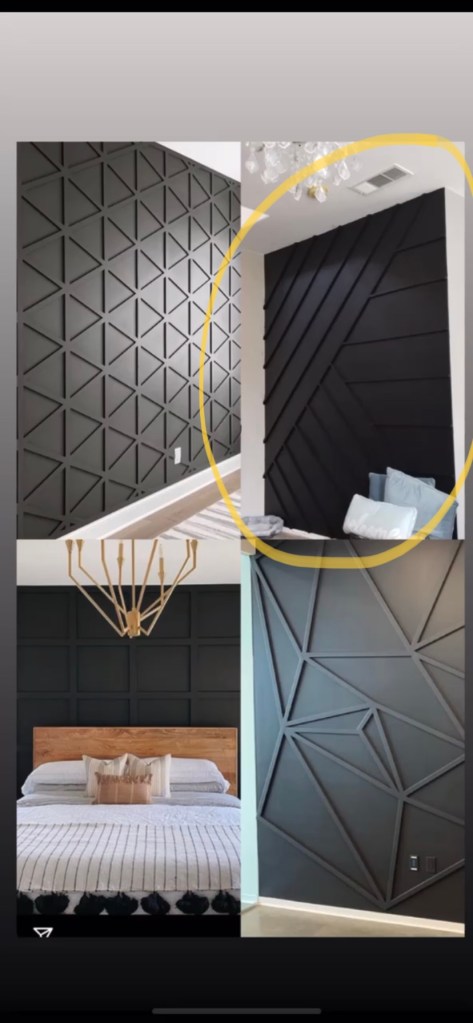
1- First, I found an inspiration picture that I loved . The circled one is what I chose
— I didn’t copy the exact shape/design or MDF placements, but I used it as a great guide.
2- I made a list of products I needed at Lowe’s & list of things I already had.
Lowe’s-
⁃ MDF boards (I bought white primed 2.5 inch x 8 ft long boards) I believe we used about 15 but bought 20.
⁃ 8 boards 2x4x10 to make the desk top
Already had-
⁃ SW Black paint
⁃ Painters tape— I use the green “frog tape” it truly doesn’t rip the paint off
⁃ Brad nailer we use an air compressor attatchment which works well!!
⁃ Step ladder
⁃ Measuring tape
⁃ Level (importanttttt!!!)
⁃ Stud finder
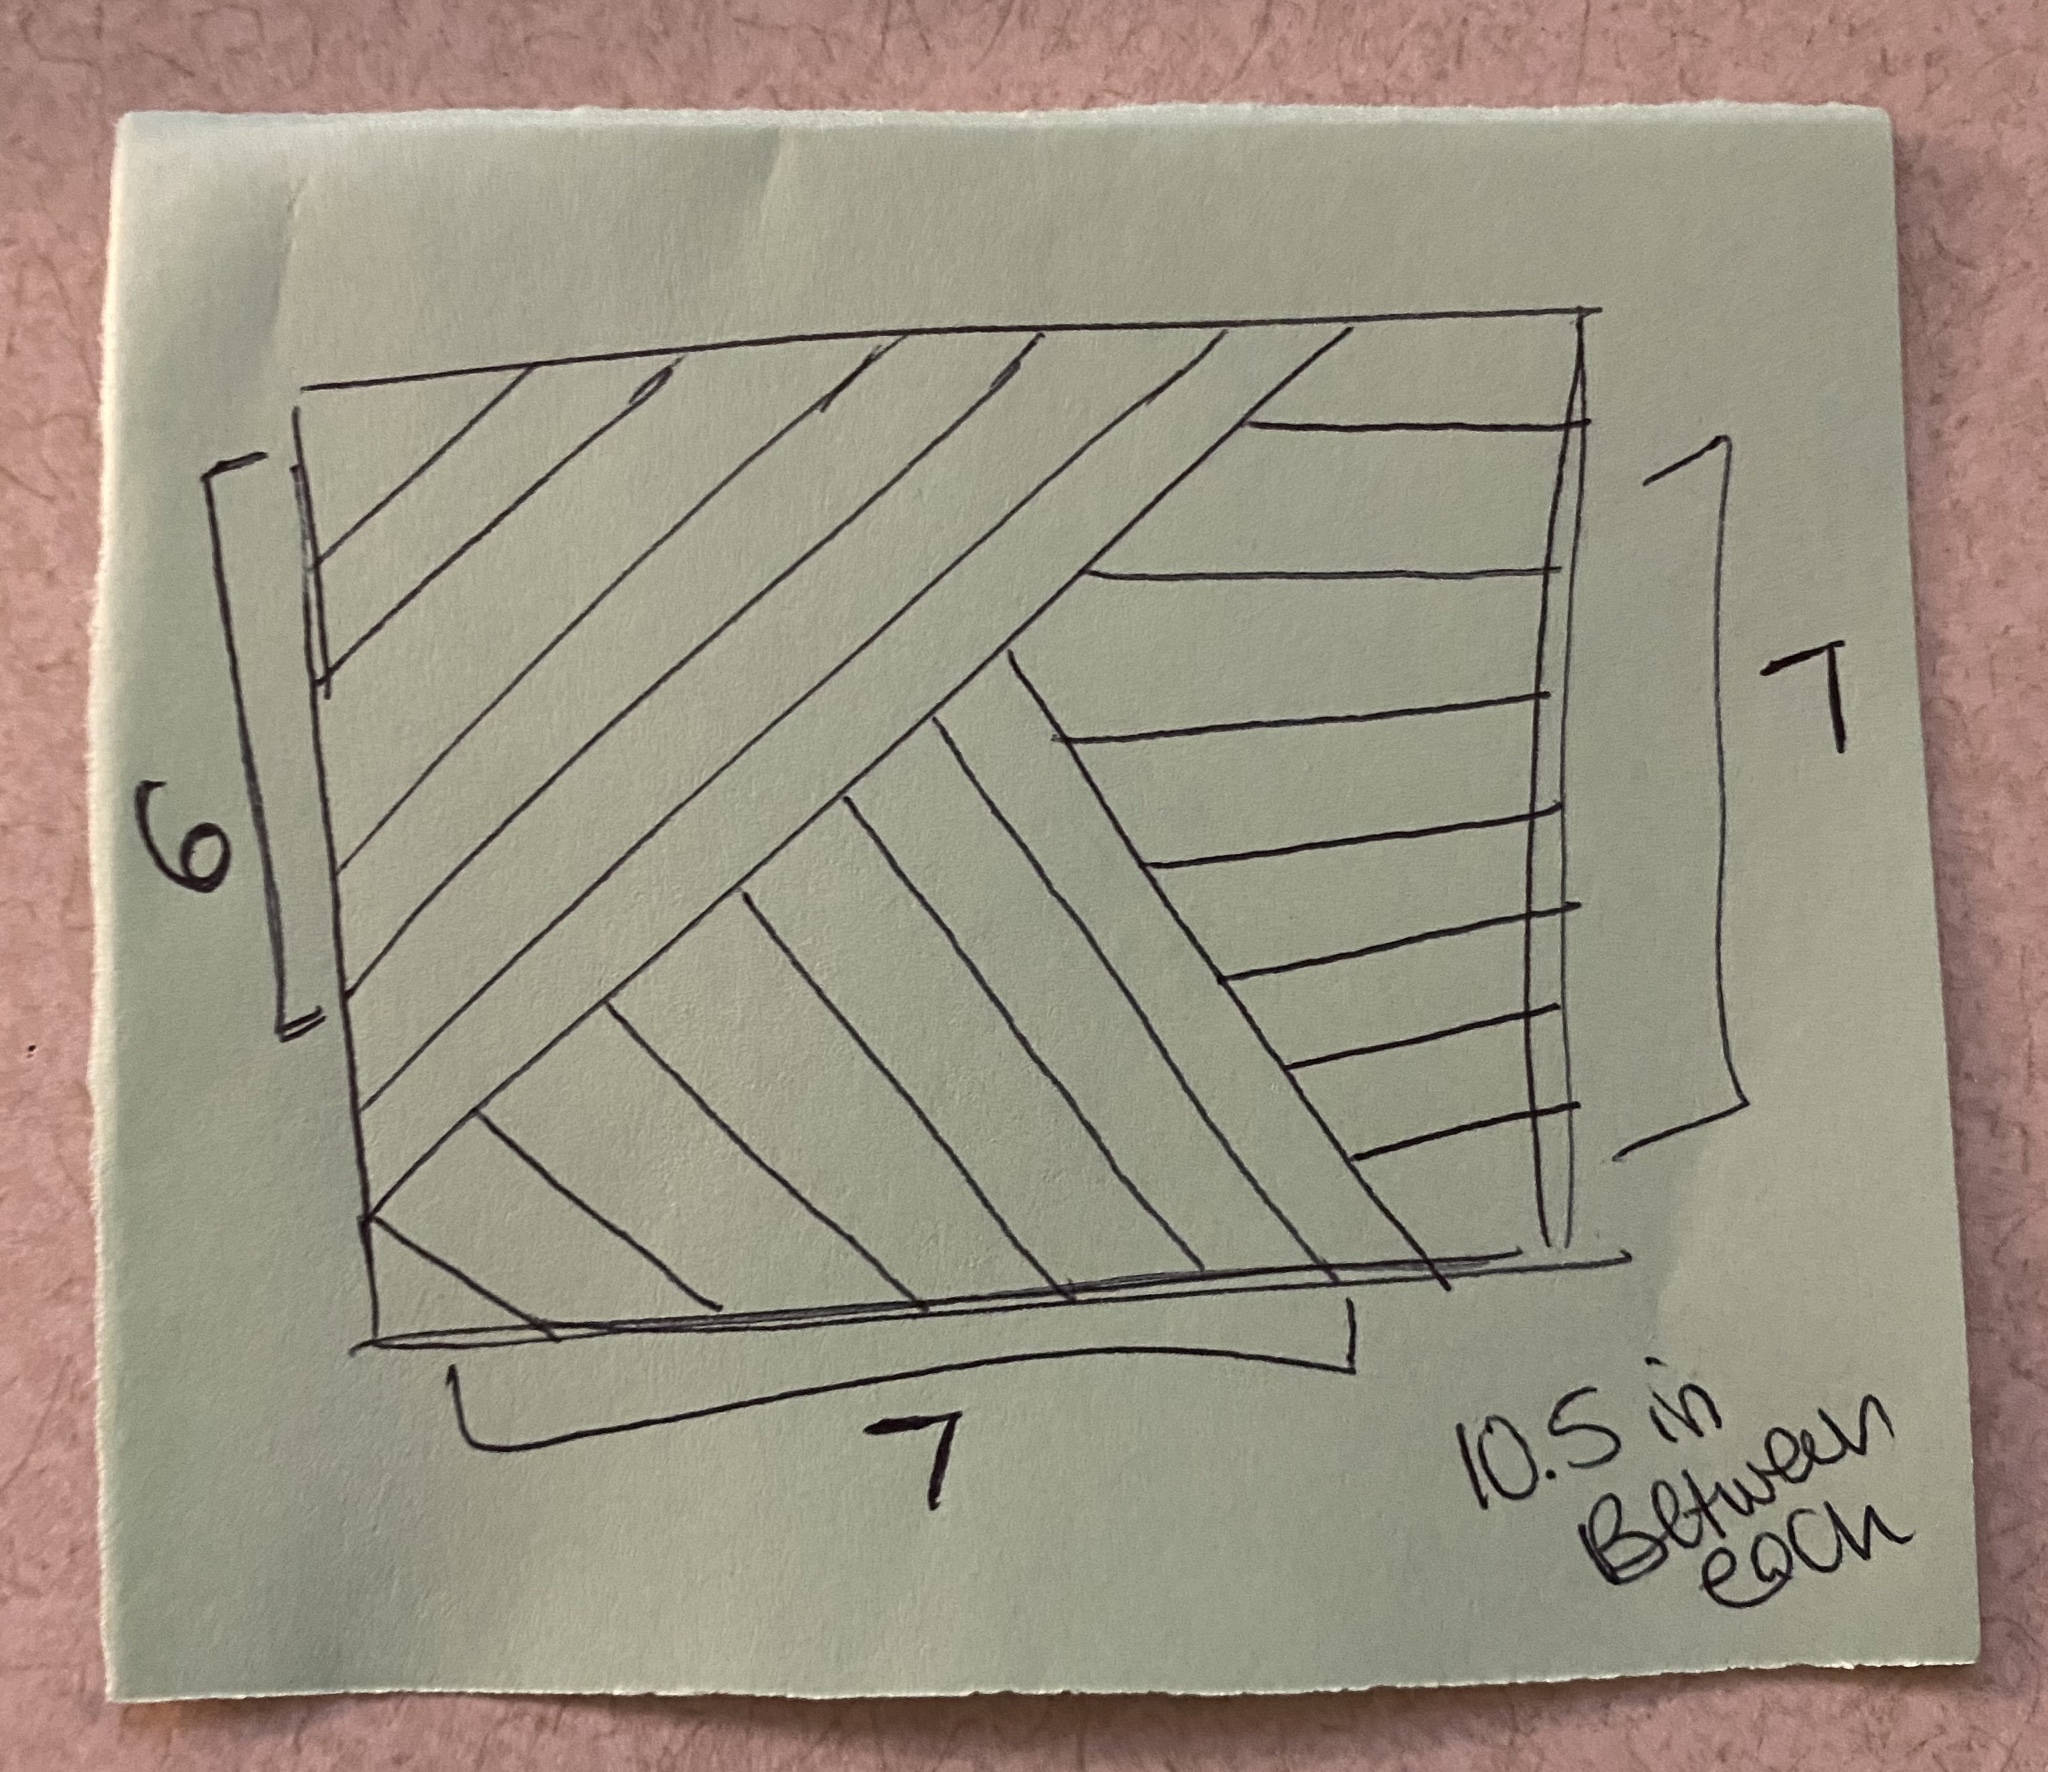
3- I decided on my layout I will add the drawing here. For The room is 8ft tall by 11ft long.
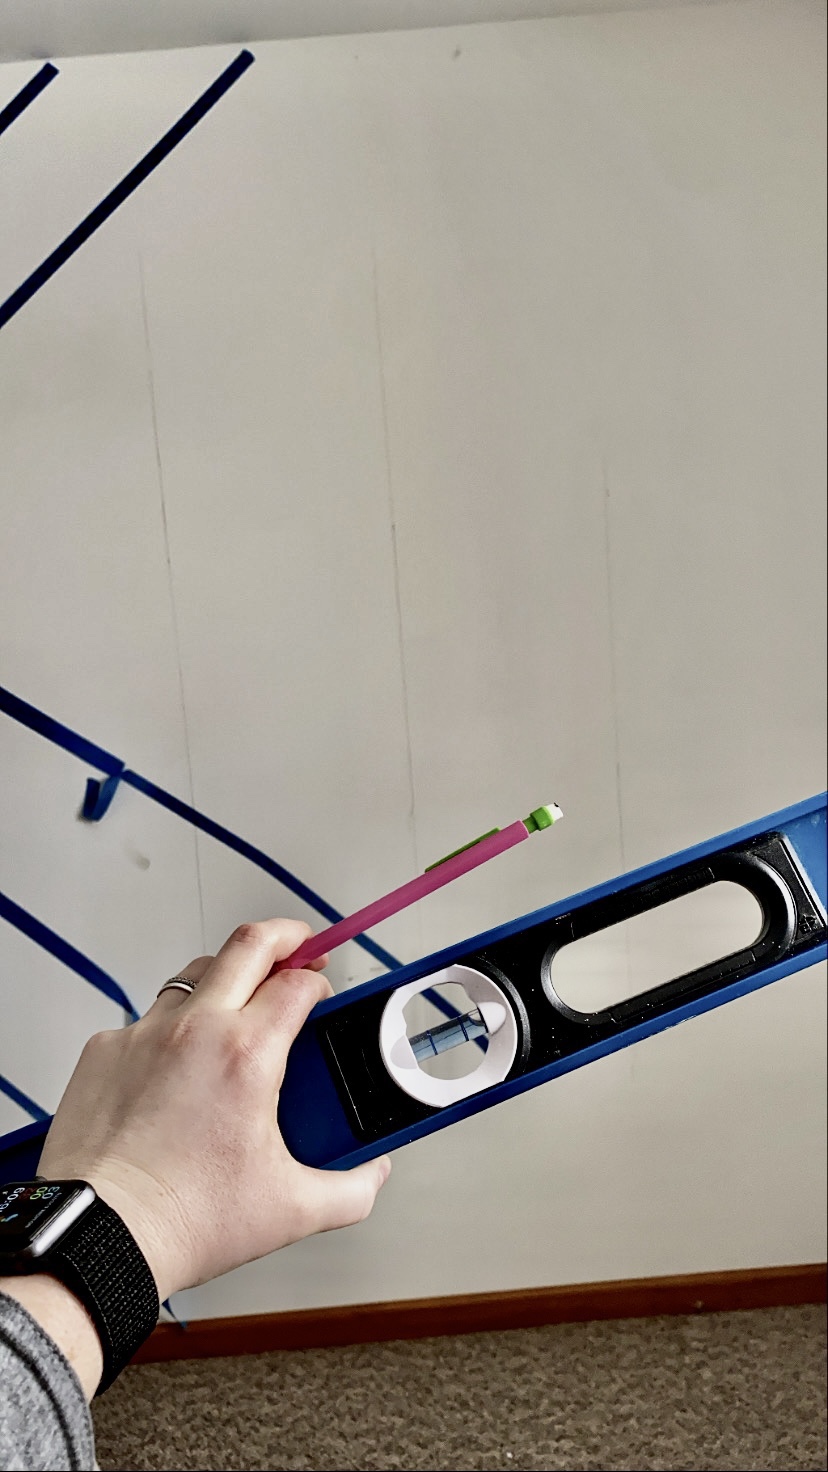
4- We then marked the studs with pencil (drew lines all the way down the wall from ceiling to floor to make sure to put the brad nails into the studs.
5- Then Split it into three sections- each with a diff angle.
First section we added 6 diagonally left to right upward
Second 7 boards – downward leg to right
Third is 7 board -straight/ horizontal
6- So we went section by section— 45 degree angle for the wall cuts. Measured 10.5 inches in between every board and started from the top left hand corner. The measurements went a tiny bit funky as we went down , but on average they are each 10.5 inches apart. Used a measuring tape to mark 10.5 down from each board. Used a level to draw the line. Was very helpful to have two people drawing the line and making sure the measurement was the perfect length so the cut was flush against the ceiling and the wall.
7- I painted the first section of Mdf boards black before we hung them. Then I found it was more time consuming so we just cut them all and used the brad nailer on the studs which we pre lined with pencil before we started.
8- used the Sherwin Williams in satin
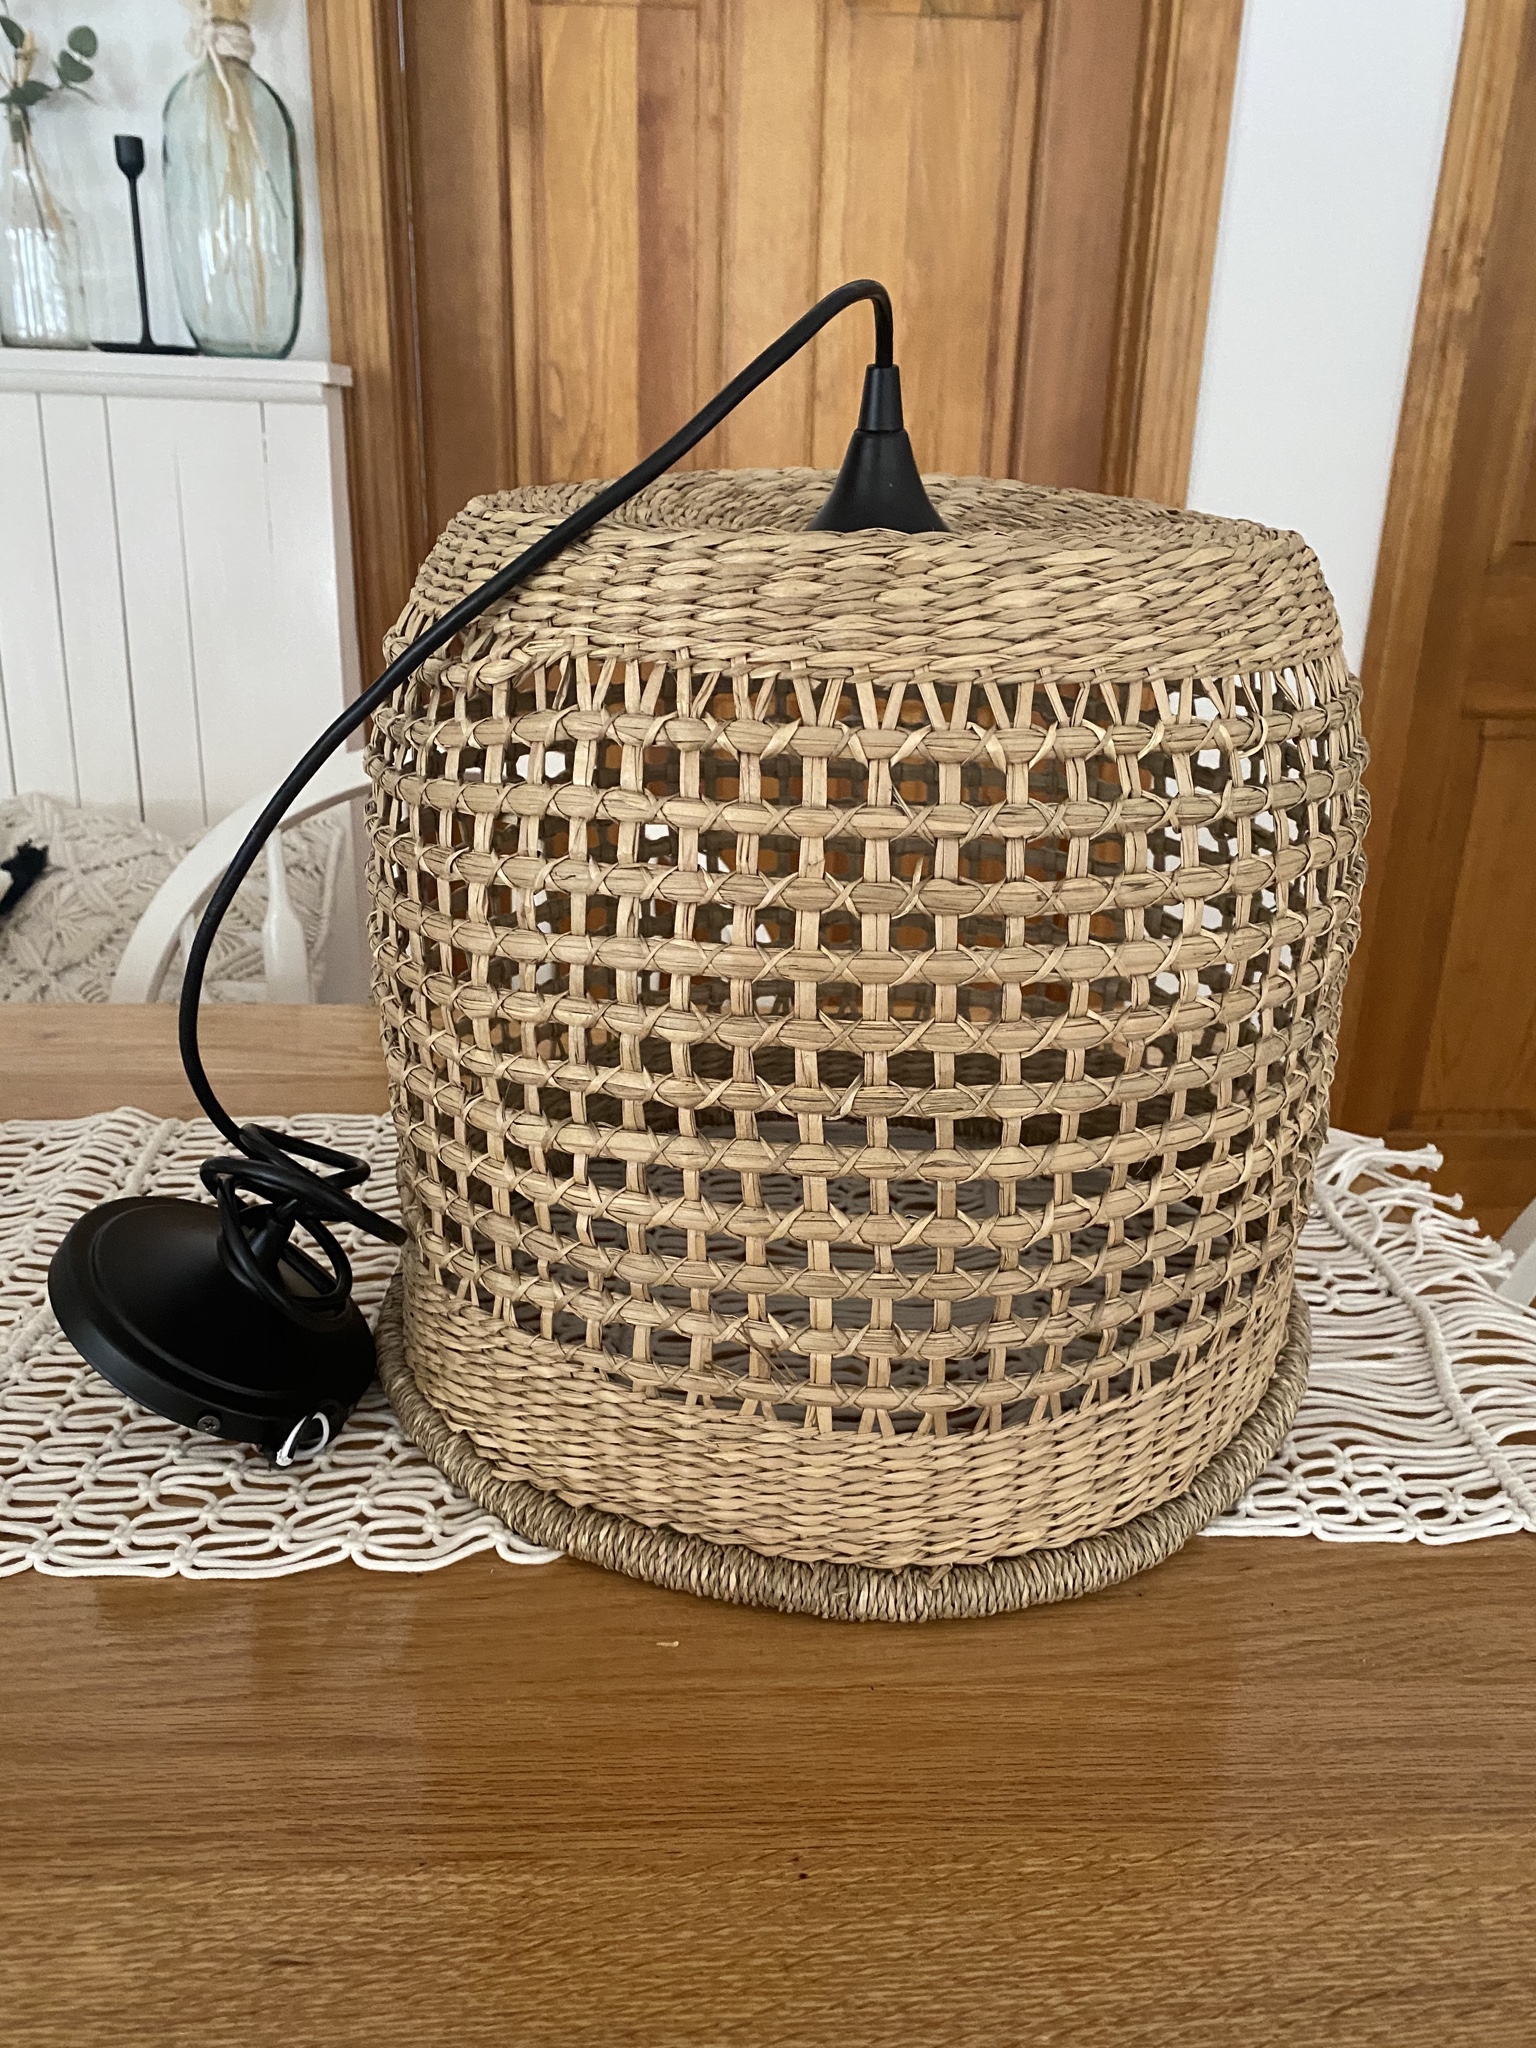
9- Light fixture— I did a basket light hack for the rattan chandelier for hen office. I used a basket that had a rounded shape from target. I searched for a basket that didn’t have a square bottom or firm 90 degree angle so that I could hang it upside down and put the pendant light sting in it.
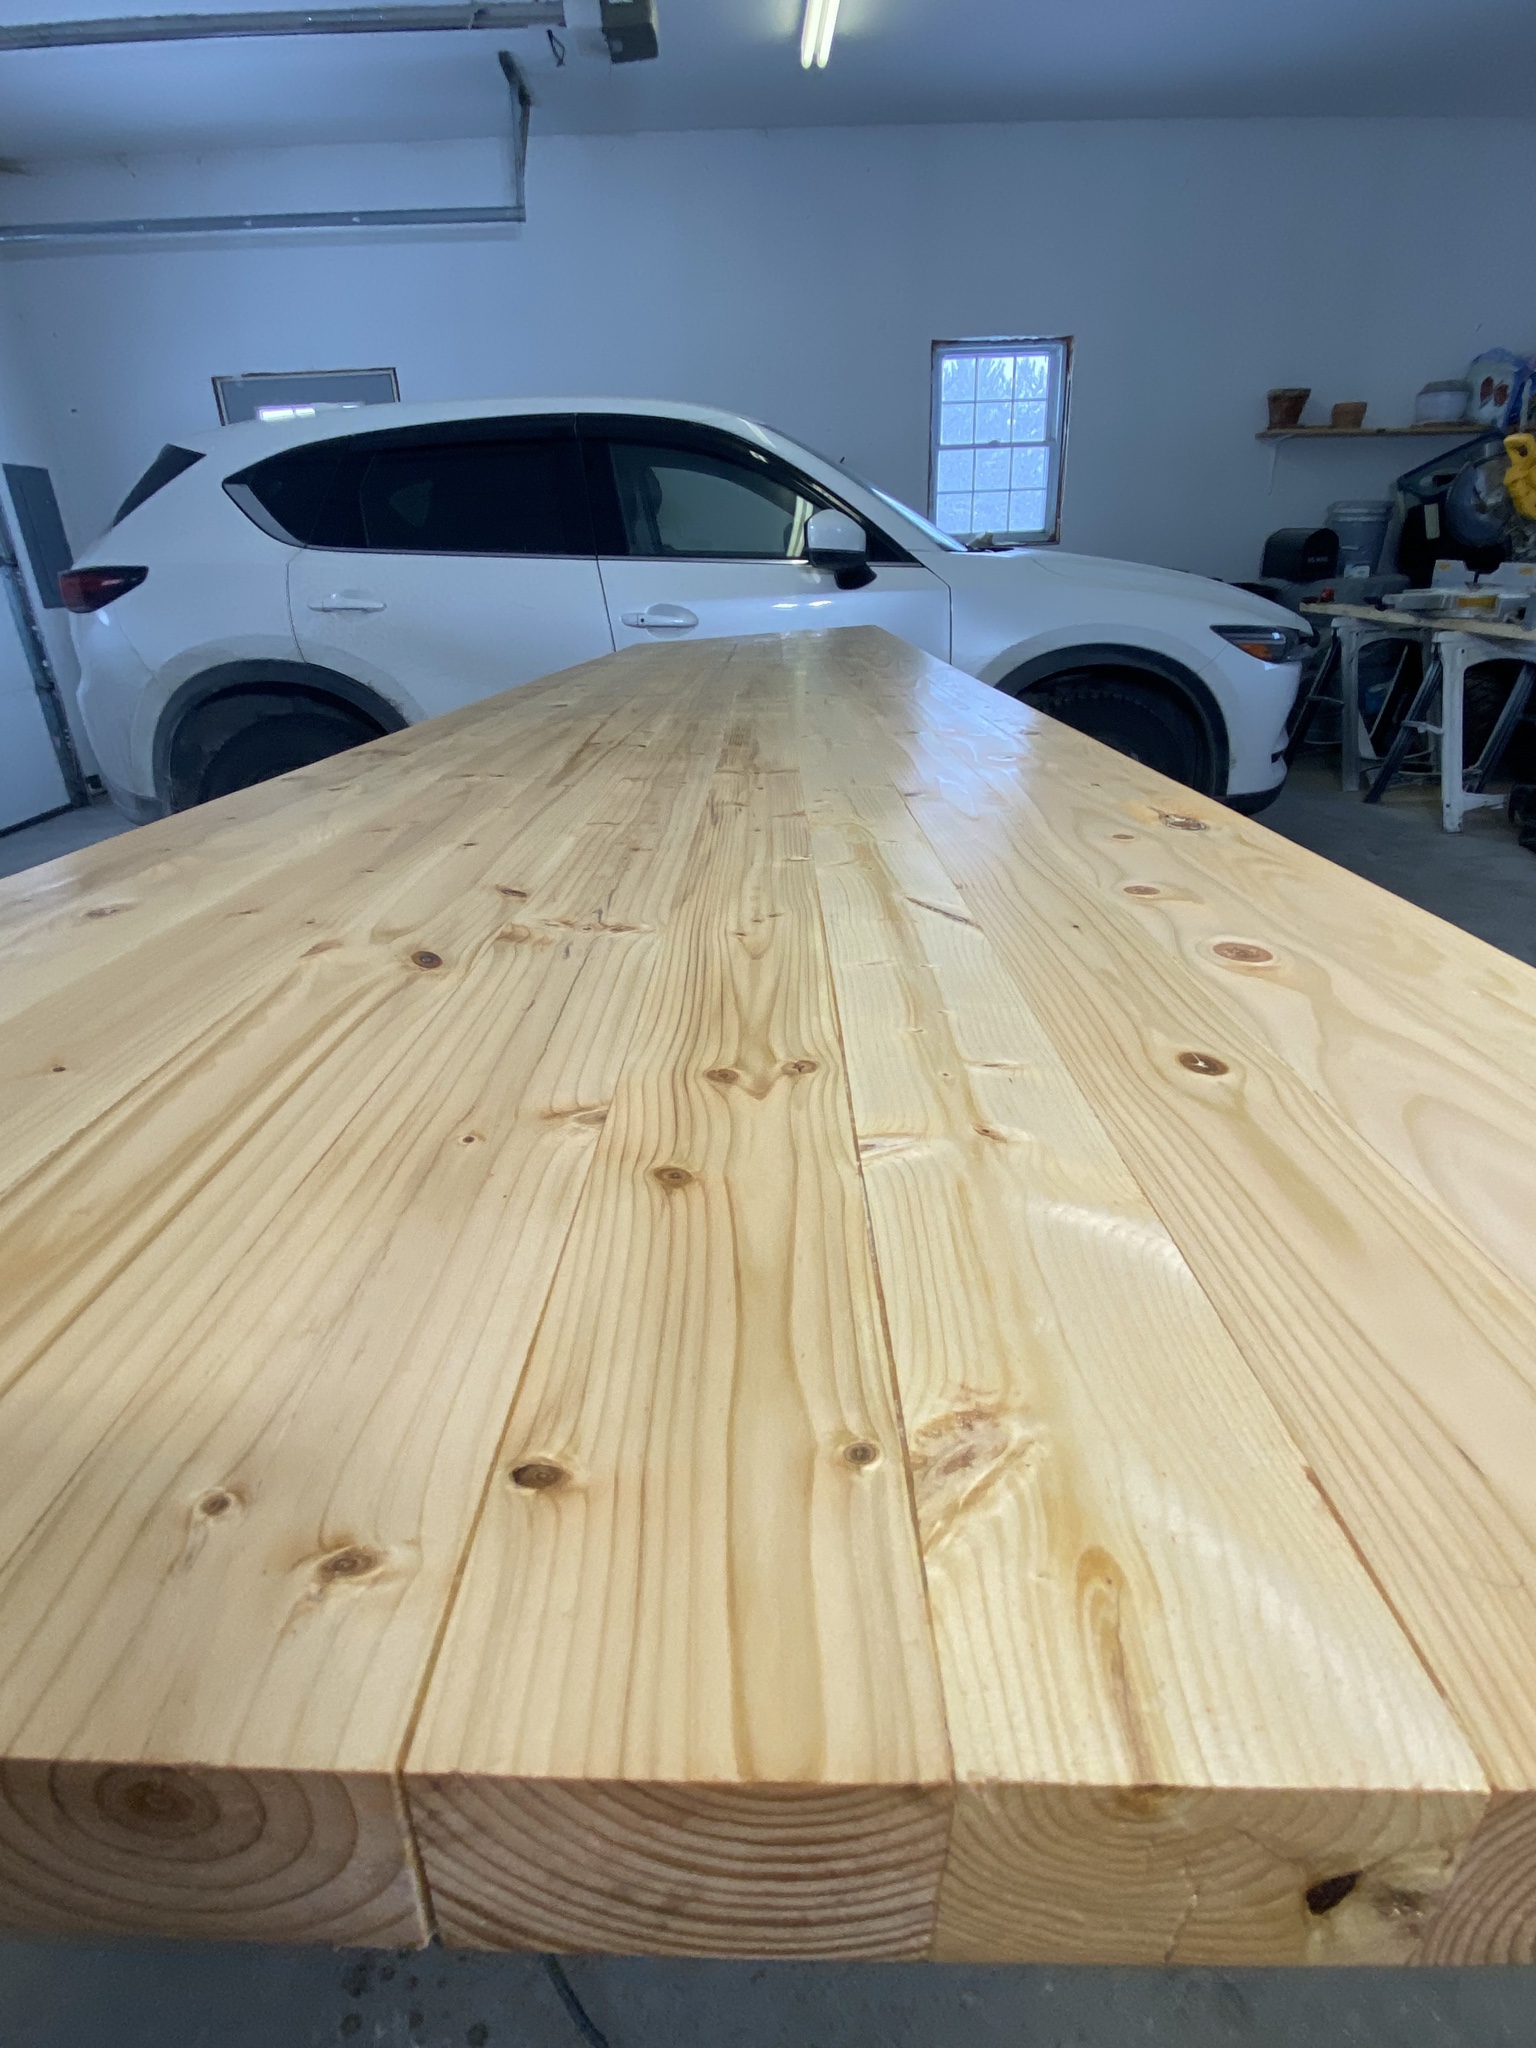
10- DIY BUTCHER BLOCK- I love love anythjng and everything butcher block. Matt found a way to make it cheaper than buying a countertop butcher block slab- which they do have at Lowe’s but we were trying for the smallest budget. So he took each 2×4 and on the table saw he ripped off about 0.25 (1/4th) inch off each side (to cut off the rounded edge). So each board ended up being a little less than 3 inches wide. He then took two and used wood glue to attach them. He used clamps on each end to press them together. He did sets of 2 and then when they were dry he clamped the sets together overall gluing all 8 together.
11-Once that was finished and dry he and I both sanded them down for a smoother surface.
12 – We then filled the cracks and holes with blonde minwax woody putty. Let that dry and sanded again with finer sandpaper.
13 – I used two different stains (my fav combo!! )
First I use minwax Ipswich Pine and then wipe/ smudge off with paper towel. Next before is dries I add minwax natural stain and then wipe off.
14- once again is dry I used Minwax oil based glossy polyurethane. I did three coats and lightly sanded in between each coat!!
The oil based took a bit to dry and set. So we waited a full 24 hours to bring it in the house, and then another 12 before I put anything on top of it. I have wised both water based and oil based polyurethane and the oil is by far smoother and a better finish. I will be using that from now on.
Finishing touches!!
15- I put together the two furniture draw sets. Then we placed the desk top on it. The rug came in, put the chair together. Hung the gallery wall, I decorated and hung the light fixture. Finally we hung the beautiful macrame wall hanging for the finishing touch & then I posted the reveal!!! Here are some pictures!! 😍😍
Who doesn’t love an amazing before & after— 😍🌿💓
Cost breakdown for office—
$95 =Mdf boards (Lowe’s) 6.29 x15=
$85 =2x4x10 for desk top- = $10.58×8
$218 = 2 ikea dupe draw sets 2x $109 =
$230 = Macramix tapestry (I bought for my wedding but hung here) =
$70 mis century modern chair
$25 burnt orange blanket
$55= gallery wall-12×12 with 9 frames
$20= target basket (for light fixture)
$15= pendant light appliance for light fixture
$100- Wayfair cosmo Collab rug
SW Paint- already had
__________________________________
Total= $925
All pieces of furniture will be used and moved to any room in the house!! The room can easily be made back into a guest bedroom, nursery, or anything we could need the the future. The color can be changed easily, the room can and will take on many forms in the coming years- but for now it is such an incredible room that gives me the best vibes of any room. 😍🌿💓
Thanks so much for reading & supporting me!! Leave me a like if you can!
As I have mentioned April 10th 2020 we closed on our home, moved in & started our love for DIY projects!!
To commemorate this I wanted to share a little about our house buying process- which happened to be right at the beginning of COVID!
Matt and I lived in a duplex that we owned and rented out the other side. Our plan was to get married, buy a house with land and get out of the middle of town 😂
December 2019/January 2020– We had been looking at houses casually for a couple months. I had seen our house, it was a little out of our budget but I added it to the viewing list just for the heck of it. Honestly, the moment we walked in we looked at each other and I was like” can we move in tomorrow? “ Matt said “heck yes”. We got home, did some crunching of numbers and made an offer- with a fair amount of back & forth we came to a number & it was accepted!!
Meanwhile this was in January/February 2020 and right at the very beginning of COVID-19. Places were shutting down, working from home and it took a lot of communication to get a loan, inspector and just to be able to sign the paperwork was a challenge. Long story short- April came along, we did not have the “usual” house closing that we were used to- but instead we signed our bank paperwork on the sidewalk outside the bank in a snow storm!!
In the moment it was wild, crazy and frustrating. But in hindsight it’s a very funny story to tell & we are just so thankful it all worked out.
Our house is stunning, but it needed a little cosmetic updating so we started the kitchen. Then moved to the living room with the gigantic walls and high ceilings! It was not as “quick” of a project as I was expecting. Matt thought it was the second worst painting experience to date (first was the kitchen cabinets) and from here on out he quit all painting— here we are 11 months later and still hasn’t painted another wall (lol- jokes on me).
Here is a quick breakdown of the year!
April – bought the house- painted kitchen and living room
May- full month of studying for NCLEX
June- passed NCLEX / changed wedding plans / painted bedroom and made a bed/headboard
July- hosted a beautiful backyard wedding
August- started first RN Job
September -November – both working lots to catch up our savings 😛
December- our first Christmas!!! (With a giant tree)
January- April— work work work
This house bas been the best opportunity for both of us, in different ways, but I couldn’t be more thankful or happy. I have learned so much about adulting, mostly house related, power tools, money management and more. Im excited for our future projects & future accomplishments. The best year of our lives!! Bring on more!!
Thanks for being here to support our page, our content and interacting!!
Since we moved into our home I have categorized my home decor style as bohemian farmhouse & here’s why:
When Matt & I had our first apartment I felt drawn mostly towards bohemian and minimalist decor. However, it really does matter the architecture of your home. So, since moving into our beautiful home (almost a year ago!!) I have found my style has shifted more towards farmhouse styling, mostly due to the strong wood tones of the vaulted ceilings and the large stone fireplace being the centerpiece of the living room/ main floor.
There are many other elements in addition to architecture that can be used to determine decor styles. In my home I have added the following styles-
Modern- specifically in abstract art (mostly from Etsy), funky modern vases (H&M Home) and other modern furniture pieces (amazon home & wayfair).
I still strive for minimalist spaces in my home- places in my home that I try to keep a centerpiece of decor and the rest decluttered.
Next, I have many traditional pieces of furniture that have been handed down from family & by adding those into the spaces- mostly dark wood and antique pieces it brings in a traditional home vibe.
Without a doubt though I am drawn to bohemian spaces full of neutral colors, jute/rattan, plants and macrame. I love the texture and color of rattan specifically! Anything & everyone rattan, please!!
I associate my style to all of the above!!
I would say my most frequently asked question (FAQs) is “what do you do when decorating blank space?”
When I decorate I look towards a centerpiece of the room- could be a mirror, macrame piece, accent wall, gallery wall or photo frames, a desk- really anything you want to be the part of the room you see when u first walk in.
Next, I try for a color scheme- for me it is mostly white, light grey, black, greenery (plants) light wood (golden oak, rattan colored) and rust colored orange (most recently added to my favs).
In every space I design I add white or glass vases, real or faux plants, texture pieces, books to add height, candles everywhere and I love to add neutral photo frames .
I recently have been adding abstract art, vases and decor to my home. I find that H&M Home has some amazing pieces that I love (I want everythingg on the site). It is very affordable and ships quick (rare these days).
I always find that when I go shopping for either home decor or clothing I only buy white, black and grey. So that is what my home is made up of! As well as my wardrobe (very prevalent if you watched my home tour video of my closet bedroom clothes organization)!!
Thanks so much for reading! Feel free to ask any questions on here or in my DMs!! come back next week! I will be sharing a funny story for our one year house anniversary!!!
Hi! Welcome to my BLOG!! My name is Lauren the face behind @VT.DIY.HOME. Thank you so much for being here with me ! I am excited to launch this page!! I will be filling it with conversations about so many things, including:
My home
DIY projects I do & want to do
My inspirations
My home goals
Furniture buying & wanting
Home decor- mostly affordable options!
I am excited to be navigating this new forum with you & learning more! Happy to have you here, help you learn about projects & inspire you to make your house a home!!
I’ll be here anytime to show you pictures, inspo & projects- both the final looks and the reality behind projects, and all our mistakes along the way!!