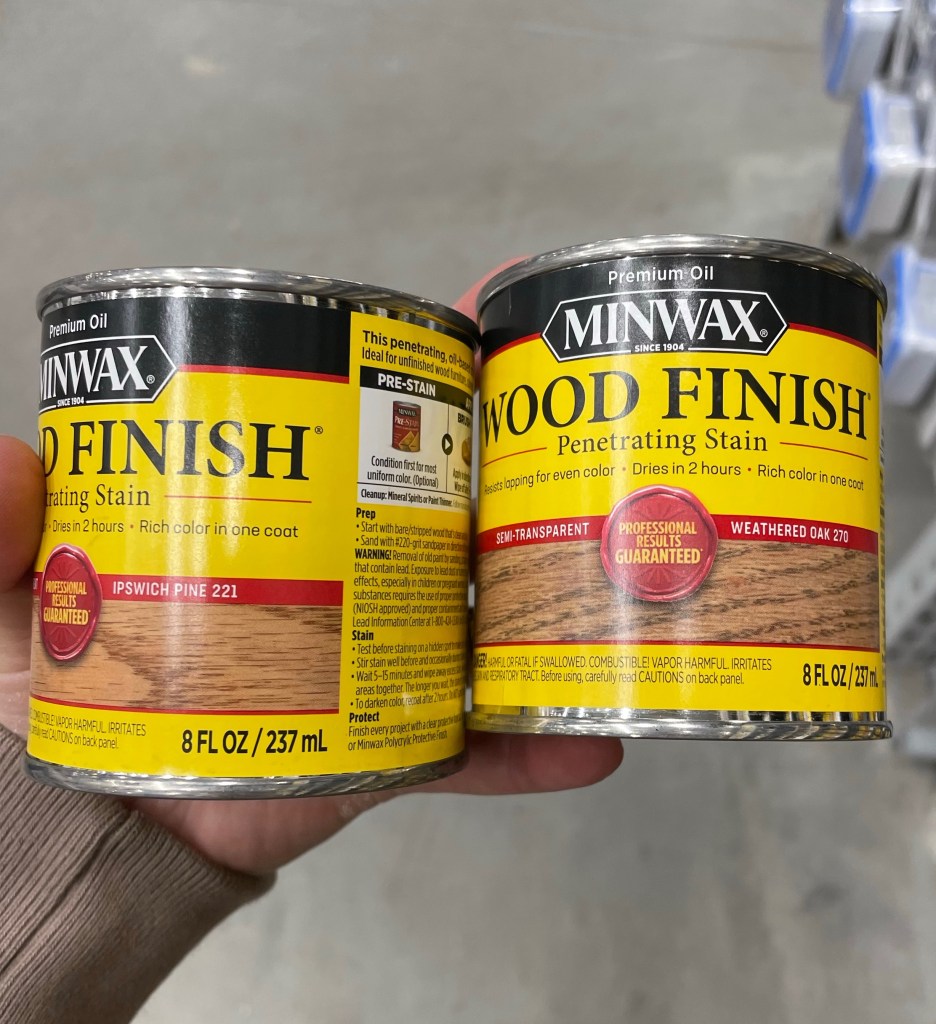
⁃ Minwax oil based Stains: pre-conditioner, Ipswich pine and Golden Oak
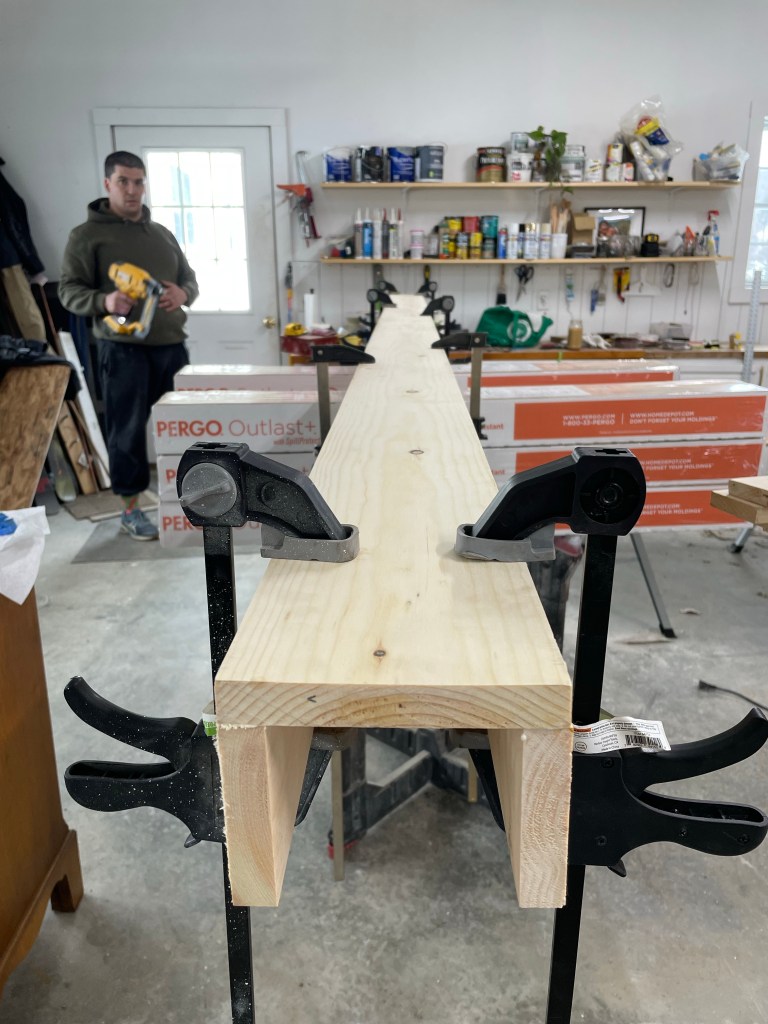
⁃ Clamps! (So many)
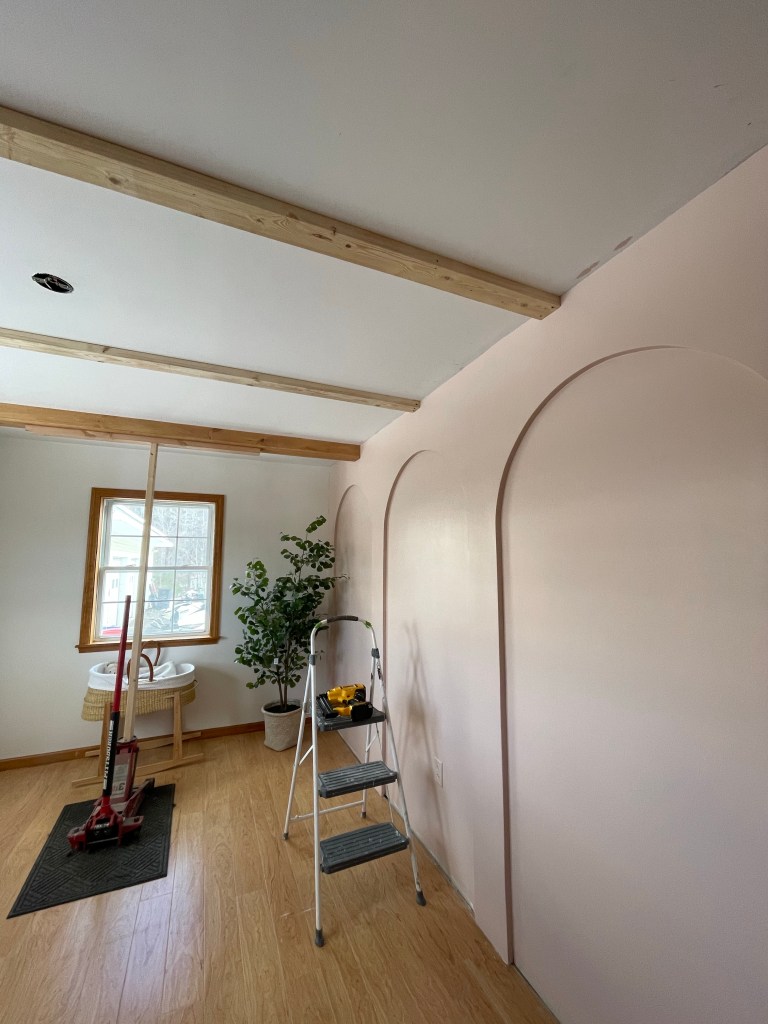
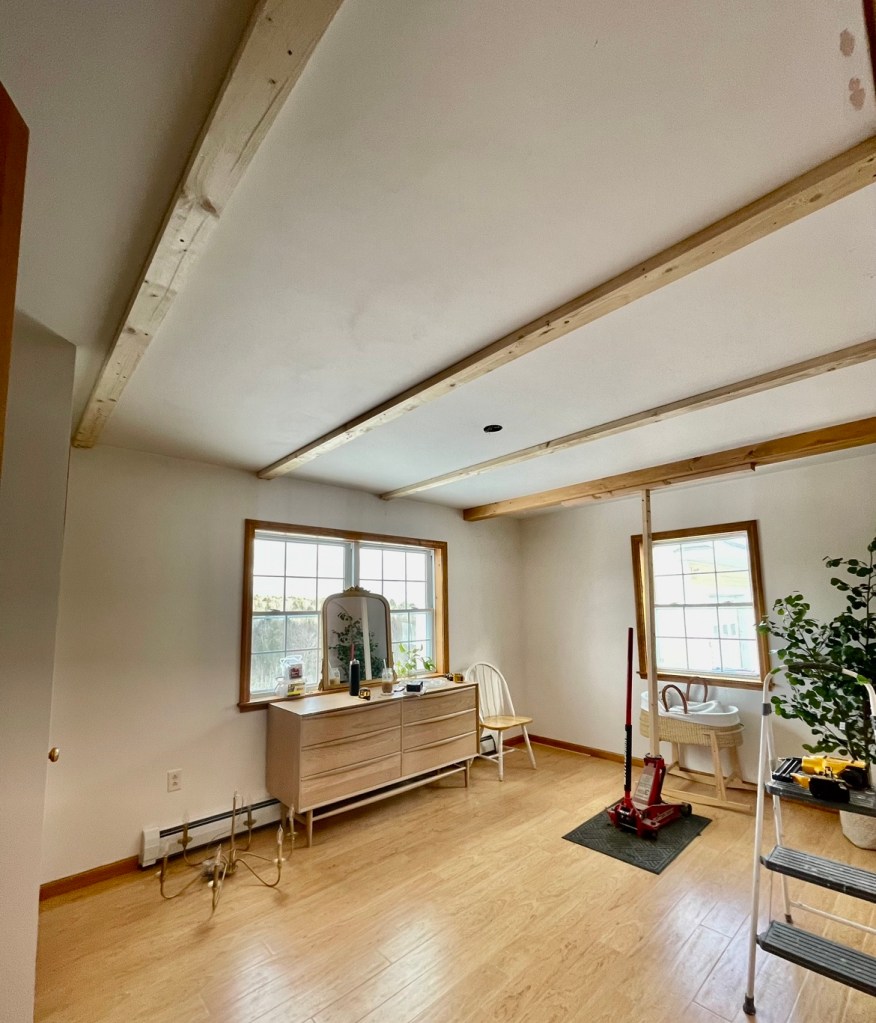
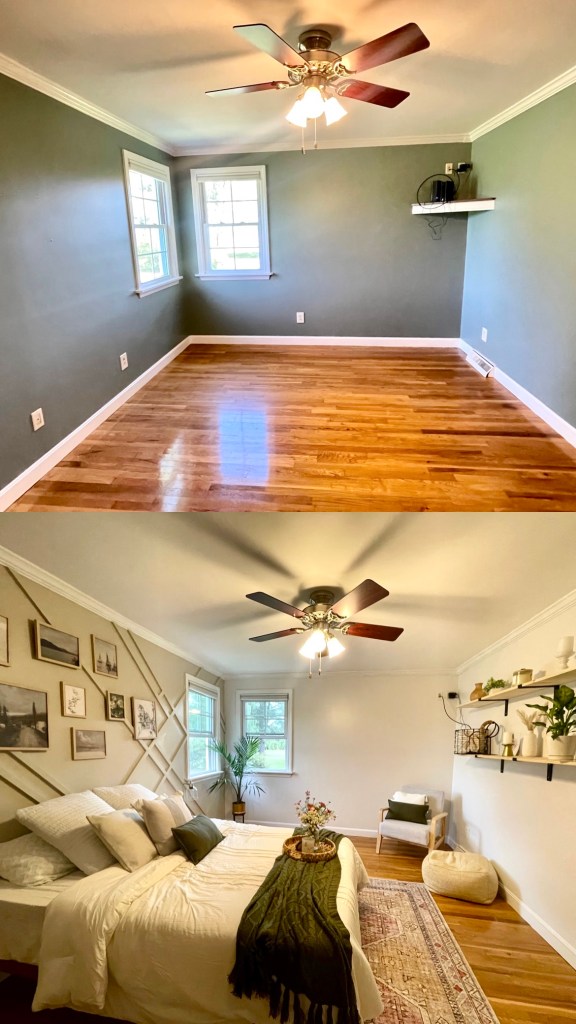
We made 4 beams for the nursery ceiling. I wanted the warm up the room & make it feel more grand! It also had to collaborate well with the arches as both are relative focal points in the room.
The ceilings in the room are 8ft
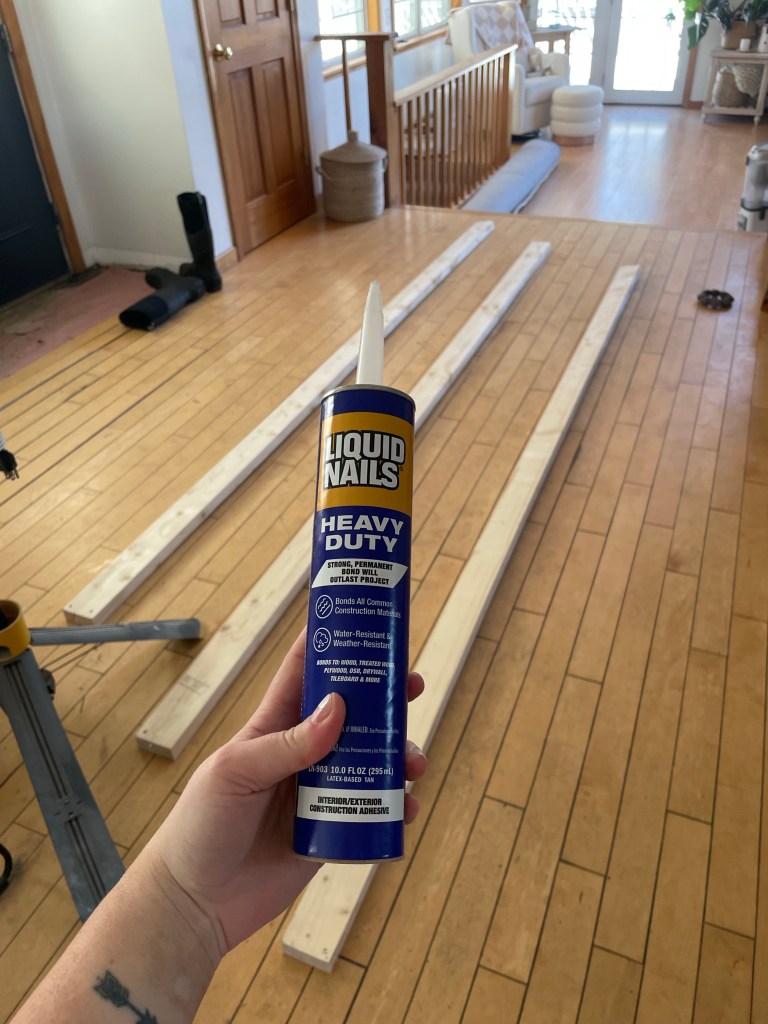
The beams we made were 10 ft 6 inches long
I used 3 pieces of wood to create the box beam— 1×6 as the face and 2x 1x4s for the sides
Attaching beams- gorilla wood glue, brad nails & clamps
When attaching to the ceiling we used a 2×6 but ripped it down to only slightly larger (wider) than a 2×4 to fit exactly inside the beam. We had some bad luck finding the proper studs all the way across the room as the joists went in the same direction as the beams. We did not check in advance during the planning phase, which was absolutely my fault😂). So we used liquid nail to properly adhere to the ceiling and very long construction screws to attach to each corner stud. We used a car Jack to hold pressure on the boards on the ceiling for the full 24hour dry time.
Building process-
1- sanded all boards to get rid of yellowing and imperfections
2- cut boards to size (started with 10ft7in)
3- wood glue, clamp, brad nail together to create the 3sided box
4- let wood glue dry with clamps on
5- brad nail together
6- wood fill nail holes & cracks
7- sand wood filler and excess glue
8- clean with rag
9- Minwax wood conditioner
10- Minwax Ipswich Pine stain – wipe on & off (I used a magic eraser!!)
11- Minwax Weathered Oak stain- on/ off
11- I didn’t add any more stain or whitewash as the color worked well for my color match to the rest of my trim!!!
12- tried to fit into room— didn’t fit, so cut off about 1/4th an inch
13- once fit we used the brad nailer to attach to the inside 2×4 board for support. I nailed on both sides about every 12 inches
14- all done!! The whole process is documented in IG stories (beam highlight) or ig reels😍
– dust control joint compound (I used almost a whole tub of 3.3L pail)
-drywall tools (joint knives, scrapers and mud pan)
– clamps
-HD flexible PVC corner bead
-drywall T- Square
-folding razor blade (utility knife)
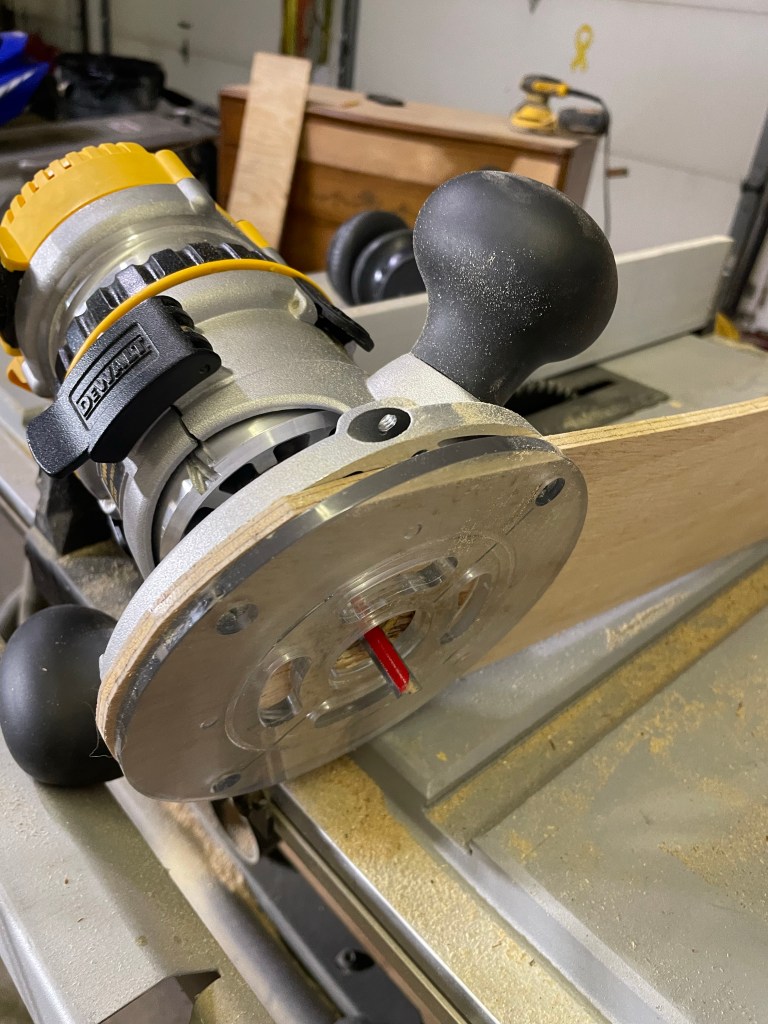
– Dewalt router
– Router bit
– Dewalt drywall cut out took
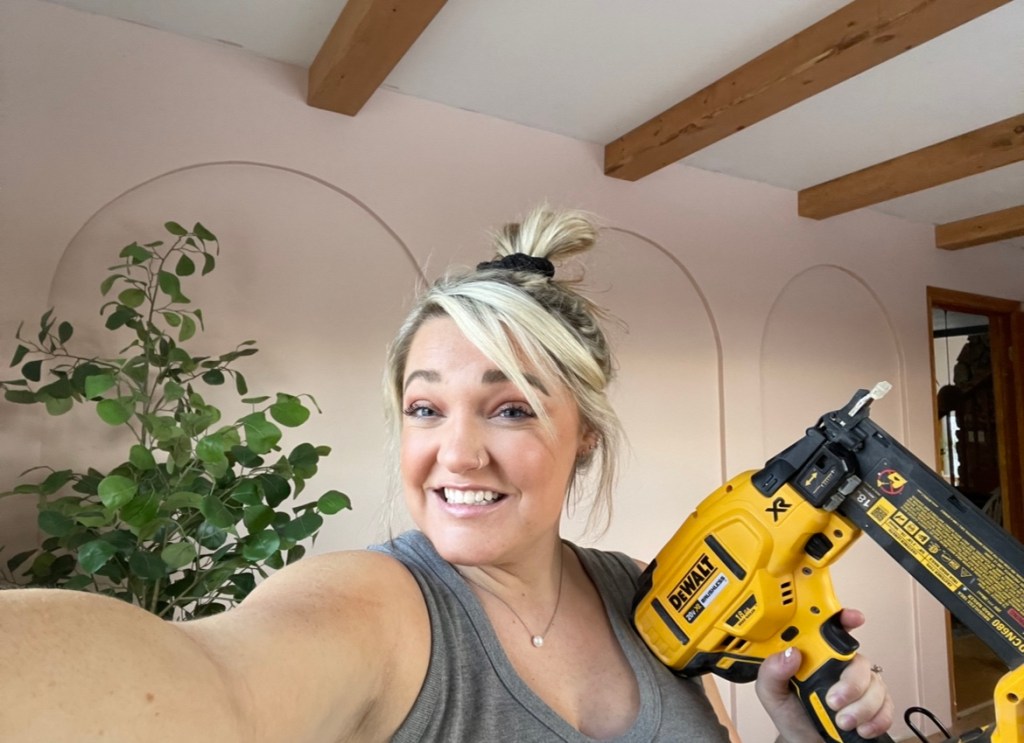
⁃ dewalt brad nailer
⁃ Paint: SW Snowbound and
-BM Odessa Pink (lightened by 20%)
⁃ Drywall shaver
-sanding blocks— 120 and 220 grit
-dewalt battery shop vac— THE BEST TOOL EVER
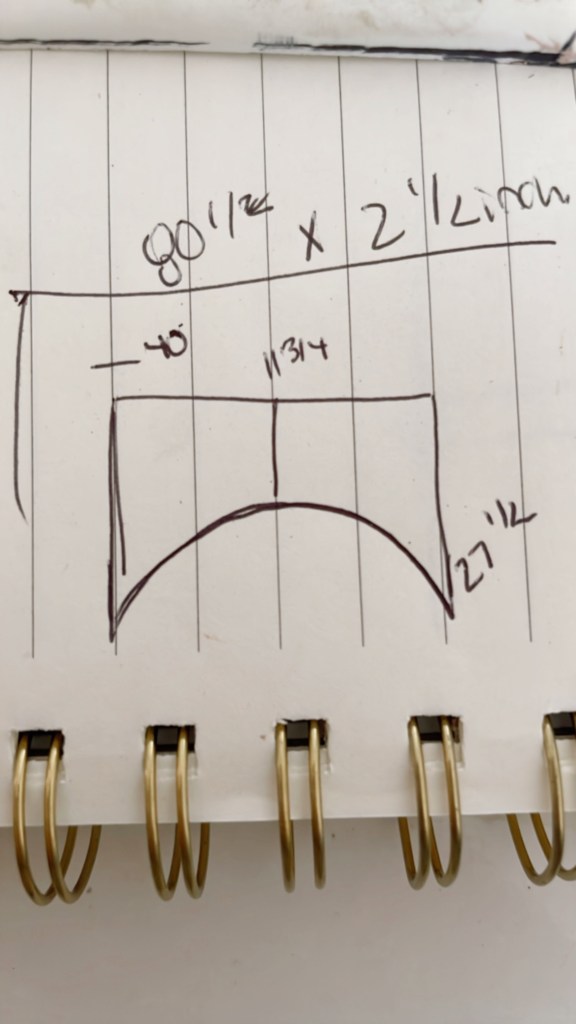
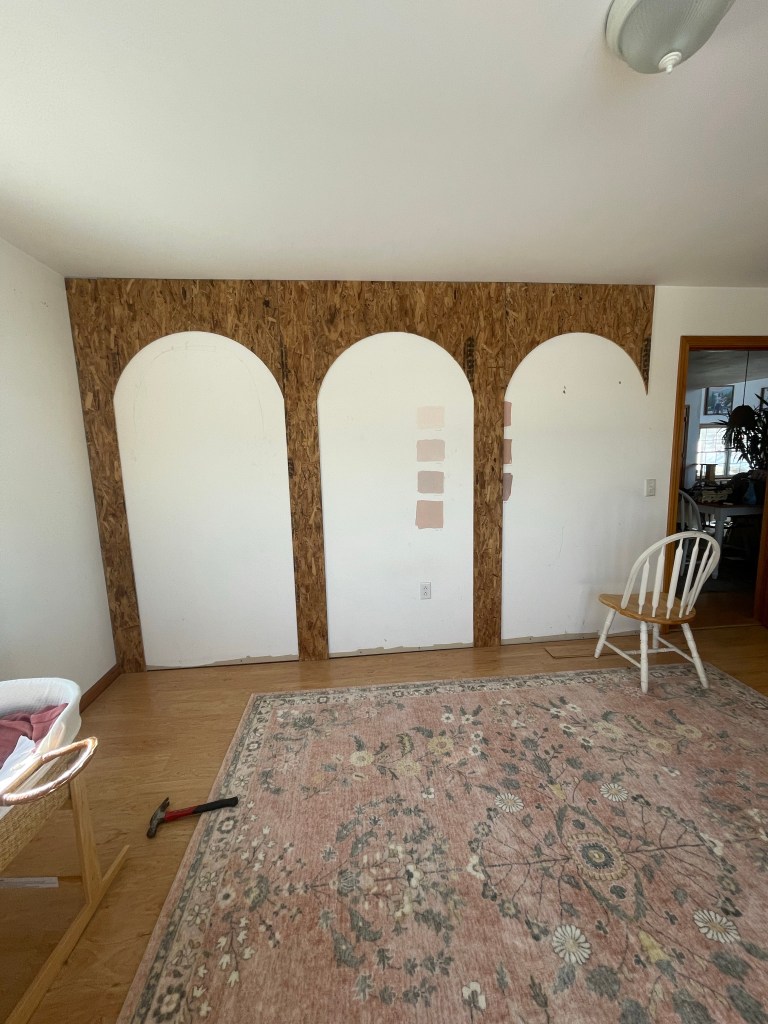
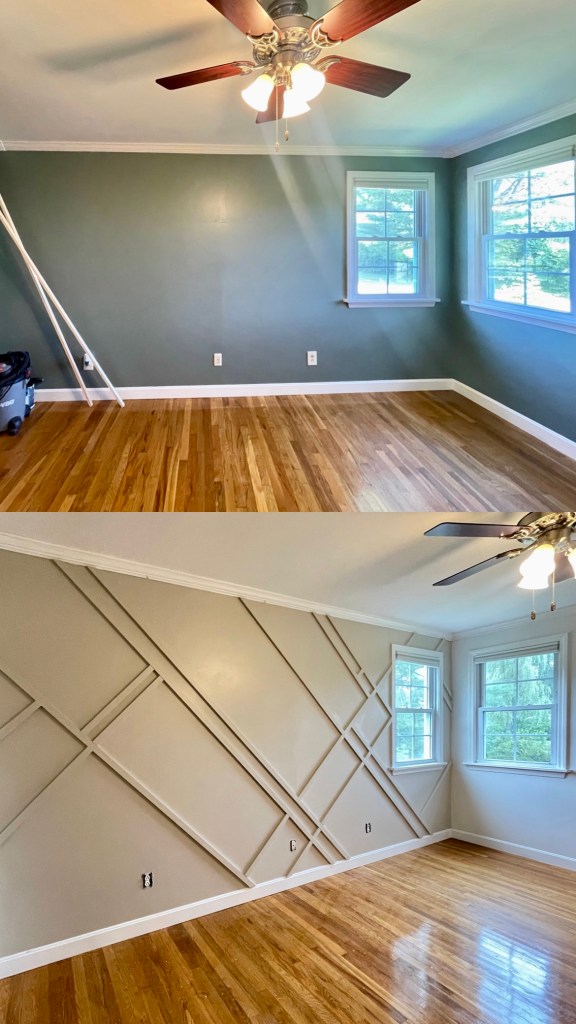
Step 1- Math😅 – I measured the room, the wall I wanted the 3 arched on & started to calculated the proper dimensions. Example- the distance between the three arches, the radius of the half circle/arch, the height of arches in proportion to the wall size. I ultimately chose the arches to be around the same height as the door trim- so it would look rather symmetrical even tho only doing 3 arches next to the door.
The arches are all the same size in height and radius, but the distances between the three are different- just due to where I wanted them on the wall and the length of the wall (minus the door).
Step 2- Building- We used the table saw to cut down our straight pieces of plywood for each side of arch. It was 4 total for either side of the 3 arches
3- Next, Matt created a jig (guide) for the router- so that all the arches will be the exact same- it is essentially a stencil
4- Once we had the dimensions and jig, we took the ½ inch plywood and started to measure out and attach jig- it attached in the exact middle of the arch or the center of the circle
5- Used the router to cut all three arches to these measurements
6- Went into the room, dry fit everything to make sure the arch looked good, right measurements and proportion- then cut the next 2.
7- Used the dewalt brad nailer to attach the plywood pieces to the original wall
8- Next was drywall! I cut the straight pieces of drywall, just like I did the plywood (same dimensions). When cutting the straight pieces of drywell though, I used a razor and straight edge with clamps to make sure the edges were are straight as possible.
9– I placed the drywall onto sawhorses and then used an arched cut out from the router as a guide to cut around- I bought a new tool for this part- The dewalt drywall cut out tool- it took some time and some swearing to get it to work properly, ultimately matt has to use a separate tool to tighten it enough that the bit didn’t fall out—eventually it worked well on the third arch.
10- next I used drywall screws and my drill to put up drywall. I had to shave some some pieces to fit exactly. And once the arches were in place I used a razor blade to cut down the drywall that was overarching the plywood- bc the plywood arches were exactly perfect I made the drywall a little bigger so it could be carved out.
11- flexible corner bead— the MVP of this project for sure!!!!! I bought ours at Home Depot and it was very easy to find and use. The dimensions of it were a little too thick— so I had to trim off like 1/4 of an inch to fit, but once it was on it was great. I used the same drywall screws to attach it and some of the plastic stuck thru song I cut those off with a razor- after the fact Matt looked up that you can use a stapler/staple gun and the likely good that the plastic would stick up was a lot less- so maybe in future I’d use that.
13- drywall!!!! I used screen tape for in between all the sheet is plywood I put together and alot of mud. I made the first coat thin. I added alot of mud to the arch- in between the drywall and corner bead & let dry. I sanded with sanding blocks (180 grit) in between coats. I did approx 5 times sanding and re-coating which was a day each time. I used a fan and closed the door to the room as the smell while curing was rather strong.
14- once I didn’t have any more bumps in the drywall I used a 220 grit sanding block to get it super super smooth and wiped with to wet cloth to get all dust.
15- cleaned and vacuumed and mopped for hours— so so much drywall dust!!!!!!
16- primer!! I used PVA primer
Primer
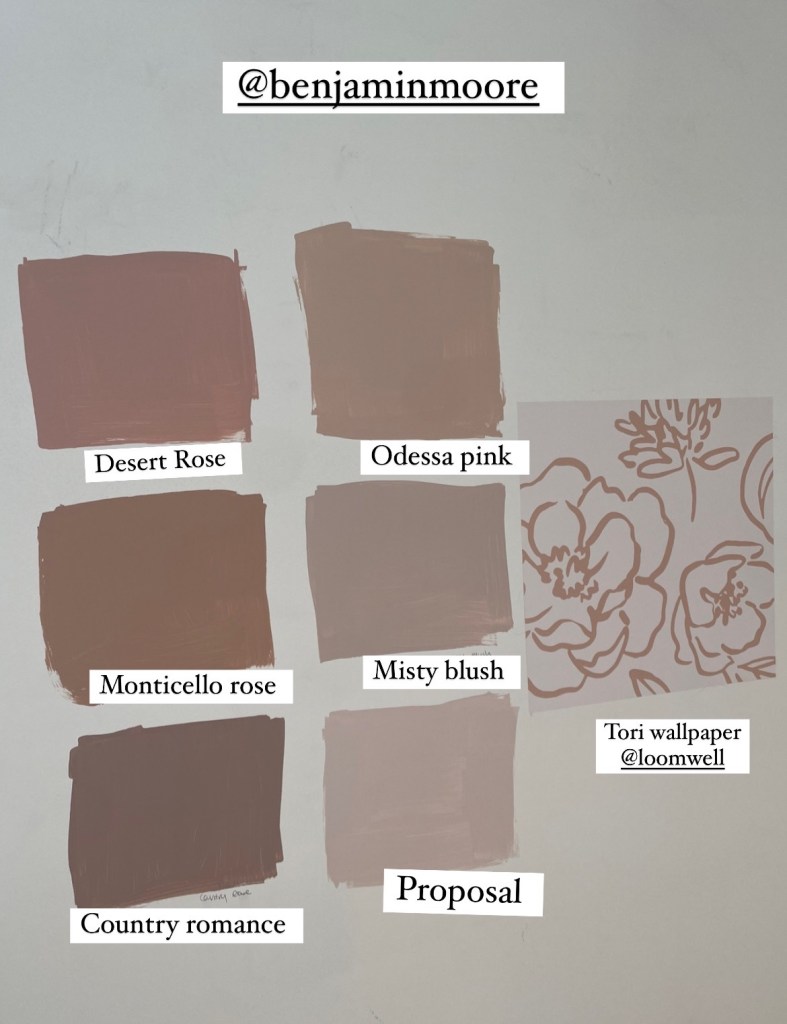
17- paint! I used Benjamin Moore Odessa Pink in satin- lightened 20% — two thick coats- I LOVE the finish of the paint and the quality— honestly more than SW which I thought I’d never say.
18- cleaned more!!!!!
19- then ready for beams🎉💪🏼
My whole process is posted into videos, reels and in the “ARCHES” hightlight!! Thanks for following along!! @vt.diy.home
The plan is to create a neutral girl nursery, with pops of pink. I want to create a feature wall that has three arches as the focal point of the room. Beams-of course! I want to incorporate some wallpaper somewhere, gold accents, neutral furniture & beautiful/earthy decor accents.
Step 1—Floors: using @Pergo laminate floors in color Northern Blonde maple- the room is 10×13- installing this floor is fairly simple, as long as you start out exactly straight/ level
Step 2—Arches: first step is cutting ½ inch plywood into the shape of arches- I am planning to follow the tutorial by @jennasuedesign- she did it in one of her latest projects! Plan- cut strips of plywood for the in-between arches with table saw, then use router to create the arches- all three need to match so we plan to make a jig that creates the exact diameter that we need for our specific wall measurements.
Then, dry walling over the plywood, making the arches inset and arches match the wall- they will then be painted a pale pink color ( yet to be decided—loving BM Odessa pink lightened by 20%) .
Inspo— 3 arches & 4 beams.
Step 3— Beams: I plan to make 4 beams, two on either side of the light fixture in the middle of the room. They will not all be exactly equidistant to the room, but instead centered off of the light. I plan to make them out of two 1x3s (two sides) and a 1×4 or 6 as the bottom piece that is mostly visible. I will cut them at 45degrees and hopefully be seamless. These will go the long way across the room from doorway to window—being about 10ft long. I plan to stain them a light wood color, matching the floor, dresser and crib wood tones (all light/ Natural tones)
Step 4—Wallpaper- I am going to be using @loomwell- I believe I decided on the pattern: “Tori wallpaper by Hailey Creative”- the current plan s is to put it on one wall- with the mirror and bookshelf
Step 5— Paint- the feature wall with the 3 arches will be pink, because the rug I chose from wayfair is pink and the goal is neutral room I will be painting the other 3 walls white- I plan to use my favorite white – SW Snowbound- matching the rest of the house!
Step 6— Closet: I want to build a nice builtin closet system- with at least 2 racks, some shelving and storage ability. I have a couple inspo pictures, but hasve yet to decide on a layout. I am collecting a good amount of clothes, so this should be happening soon ;p
Step 7— decorating/ organizing! Assembling the rest of furniture, organizing clothes, toys, books, Adding gold accents, art, décor, toys and baby supplies we will need!
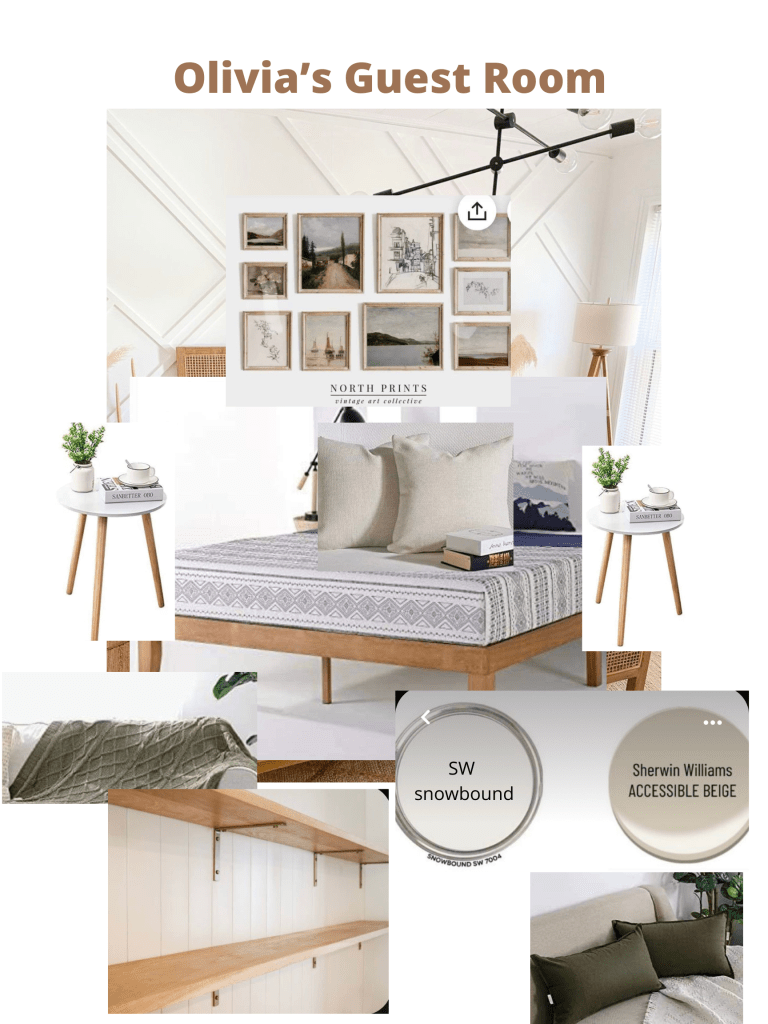
Plan was to paint 3 walls snowbound and add an accent all behind the bed. She wanted a modern accent wall, I sent her some possibilities of patterns, sizes and she chose this inspo picture from @modernly_you’s home. We chose to do it the same accent color of the bathroom- SW Accessible Beige in satin.
Decided to do two long shelves (8 ft long) on the opposite wall for décor, storage, anything. We used three brackets per shelf (linked below and in amazon storefront)
Moodboard
Supplies—
1x2x8 x14 boards (Accent wall- estimation-I bought 17- room was about 13ft wide)
1x10x8 x2 boards (2 shelves)
1×10 brackets x6 shelf (amazon)
Measuring tape
Brad nailer (with compressor—Craftsman)
Dewalt Miter saw (yes it fit in my car!)
Paint- SW Showcase- Snowbound x2 galls, Accessible beige x1 gallon ( used all three gal for bathroom/ bedroom)
3 pack rollers (primer, white, beige)
3 pack brushes
I had already bought the paint for the bathroom, but needed some more pant supplies— new rollers and brushes are necessary for every project.
TIP–If I am doing a project a couple days in a row I will save the brushes and rollers in plastic bags, or tinfoil and then place in fridge. These two projects were 1 week apart so that didn’t work that well with travel etc.
Steps we took-
– Mark studs on accent wall
– Then we drew the estimated diagonal lines, where the lines were on my drawing to get a feel for the spacing and measurements
– Then cut the longest boards and started nailing them to wall. The long boards were all cut at 45 degree angle on the miter saw
– We continued to cut them to match up roughly with my pencil marks on the wall
– Only cuts were 45 and 90 degree with miter saw
– Then I primed and filled nail holes
– Caulked gaps
– Sanded wood filler
– Primed all walls
– Painted (2 coats snowbound on 3 walls and two coats accessible beige on accent wall)
Then! Decorated! The client bought all the décor, new bed, bedding, picture frames for gallery wall, printed the art & everything. I just used everything she wanted in the room to decorate and hang picture frames. Again, we have such similar styles it worked so well. I will link supplies and décor used in the room—in amazon storefront link in bio! (https://amzn.to/3R4nQbX)
Exciting news!! We did our first project for a Client!! It was a very cool experience! Let me share all about it & the process!
Here are some questions that I asked my Frist time clients! –
– what do you want updated/changed/improved? (which room, wall, paint, feature wall)
– What do you want added?
– what is your budget?
– Do you want me to do the project only or decorate also
– Do you have any inspo pictures for the space (image, wall, room ,color scheme that they love)
–
I personally plan my 99% of projects from Inspo pictures- usually from Pinterest or Instagram.
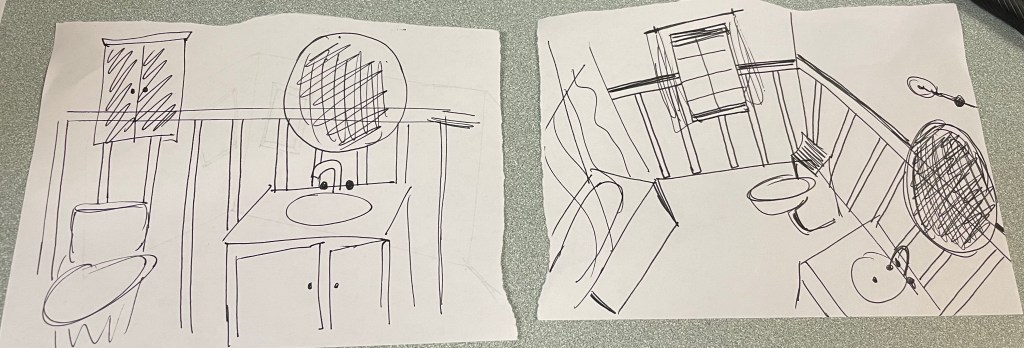
Before pic—
Olivia sent me this beige color board & batten pic, the vanity she bought for the space— I love white and matte black & adding a neutral beige colors was beautiful together.
WHOLE BATHROOM VIBES
Her overall home style is Modern Boho, the same as mine! So obviously I was excited & could see what she wanted for her bathroom.
Plans– circle mirror, more modern light fixture, LED bulbs, new black knobs for the cabinet- Paint, board and batten== beautiful update!
Here is the mood board for the space & my rough sketch.
She loved the sketches & mood board so we moved forward!! Planned a time for the project!
Steps—
1- Removed old vanity, checked out plumbing situation, what supplies are needed, ability to turn off water etc.
2- Started measuring and deciding on placement of board and battens. I chose to do them 12 inches apart,
3- Then picking the placement of battens- you can pick where you want everything to start—where you want the symmetry to be. I did not necessarily center my B&B with the light fixture or mirror bc I didn’t visualize the new mirror or vanity in place. But, the 12 inch gap is small enough that the likelihood that it would be “centered” or relatively close, was enough for me.
4- So I placed the 1/4th inch x 3in pieces around to room. Placed one, marked 12 inches from each board to the next board. A couple I had to cut (under window/ under cabinet), but I placed the vertical pieces first. In hind sight, I would place the long horizontal top piece on first, as the seam would have been more “seamless” and less wood filling required. The room itself was not level, the baseboards were not level, the cabinet above toliet, the walls, corners etc. this isn’t abnormal, but the top piece has to be the most level and I chose to do it last- next time I will do it first when doing a small space such as such with unreliable levels/ angles.
5- I used my air compressor brad nailer from Milwaukee—I love it. You plug it in, turn it on, the loud compressor pumps air into tank, it turns itself off when tank is full and you are able to nail! Eventually I would like to get a cordless option, but for now this is reliable and one` of my fav tools ever.
6- Once all battens (vertical and horizontal) pieces were in place, I used minwax wood filler to fill all nail holes
7- Then used dap paintable quick drying caulk to caulk all edges of wall to wood meeting (so either side of every board and the top where the horizontal meets the wall.
8- As I stated in my stories, the humidity on this day was horrible. The paint wasn’t drying, and caulk was not drying either. This took some extra time and patience.
9- Next was (supposed to be primer) nothing would DRY so I went straight to paint—I used SW Assessable beige on the bottom. I used a paint brush to get all corners/ tight fits of the battens, then rolled with a normal 8 inch roller size. (2 coats )
10- Rolled the top 2/3rds with my fav white paint—Snowbound (2 coats) around the top of bathtub/ shower and entire room.
11- On the shower side of bathroom there was a section that I added a 1×2 to the top of B&B—it added a nice top finishing detail. Ideally I planned to put it around the whole bathroom, but it would have caused the mirror to stick out the same distance—2 inches which would have looked a little odd. Chose to only do it on that one wall with the modern towel hooks.
12- Painted the cabinet above toilet
13- Hung new mirror with anchor
14- Changed out light fixture, added new bulbs
15- Then brought in new vanity—matt ( my hubby and plumber) did not buy enough pipe for the plumbing job. It was larger and more labor intensive than he or I anticipated, so It took the whole day and we had to go back for 2 hours the next day with the additional pipe to finish off the vanity/ water hookup. But we put tit in place and everything looked great (centered wise with in the B&Bs)
16- Added new matte black towel hooks, toilet paper holder. Added a picture frame to above the towel hooks
17- When we came back the next day- we finished up the plumbing, some paint touch ups, painted over drywall holes that wouldn’t dry previously (;p)
18- Then styled & revealed it!
AFTER!!
Before & AFTER
Supplies— (from Lowes)
– B&B’s—poplar ¼ x 3 inch x 4ft long x 25 boards total
– Shelf top pine 1×2 x8 — x1
3 pack rollers ( purdy white dove)
3 pack brushes (Valspar)
1 roll Frog tape
2 gals SW snowbound in Satin (HGTV Showcase line)
1 gal SW Accessible beige Satin (HGTV Showcase line)
Paintable Caulk (Dap)
1 gals primer
Circle mirror (tj maxx)
Black/ Gold light fixture (amazon)
Then! All my tools!!! Which I will be doing a separate blog post on! “My DIY Essentials” (stay tuned!)
I want to share all about the two new washable rugs I got!! Yes, I said WASHABLE!
I have been on the hunt for some new rugs for our home! As you all know, our two dogs, are our world!! They are cute & amazing, but so DIRTY! We have a very active lifestyle: walking on our property, hiking around Vermont & all that comes with dirty doggos!!
I had a rug from @therugcollective.co in the kitchen for the last 2 years- it was washable and the material is wipeable with water resistant features!!
“Distressed Vintage Cezanne Terracotta sky area rug in 5×7“
The rug was in a very high traffic area of the houseas it is the entrance from outside!
It held up so well (two years!) I washed it a couple times and the color, fabric and patterns stayed very consistent through the years. It is still in great condition, but was looking for a change!
I decided that I wanted to switch up the kitchen and dining room rugs & the best possible option was buying washable ones!! The dogs are the best- but It is summer so lots of mud from swimming & rain storms!!
I decided to go back to the rug collecting website & research what other options they had!!
Here are what their website states about their rugs:
• Wipe clean: Wipe off any spills NanoWipe technology makes it both stain and water-resistant
• Machine washable rug
• Anti-allergen: Reduce allergens in your home from pets and dust with Fur_riendly™
• Sustainably made: Made from recycled cotton
•
• Wine, coffee etc. simply rolls off the surface and can be wiped away with a damp cloth with zero stainings.
• And!! They have a 30 day money back guarantee if you don’t love the rug!
All of that is EXACTLY WHAT I NEEDED. So next was finding another rug pattern I loved!!I found lots of options, but ultimately decided on these two patterns.
Dining room- Sophia Heritage Rust
2nd kitchen rug- Distressed Vintage Derya Multi
I’ll attach pictures of them in each place, but they come in a box folded up, instead of rolled like other rugs. It is compact, and when you lay them out there are some creases from being folded.
My tips/ tricks for getting out rug creases:
1- Vacuum it
2- I place a heavy item in each of the 4 corners and in middle. Move around items every couple hours to assist in the relaxing of all spaces.
3- Make sure to walk on it and can always vacuum more times
4- Sometimes steaming can also help- but I didn’t use that for these rugs.
5- Once all creases are out, using rug tape or getting the nonslip pad from “the rug collective” can help too!!
So, after loving the first rug I bought from them, I reached out to the company and asked for a discount code for you guys! They gave me 20% off for you!! VTDIYHOME20 can be used any anytime on their products!!
If you have kids, dogs, cats, husbands/wives 😂 these rugs are amazing!
I highly highly recommend them & will be using them in my home for the rest of the future!!
If you buy one, make sure you send me pictures!! & use the discount code to say you that MONEY😍💰 VT.DIY.HOME
Sizes:
1st Kitchen- Distressed Vintage Cezanne Terracotta in 5’2” x 7’6”
2nd kitchen- Distressed Vintage Derya Multi in 5’2” x 7’6”
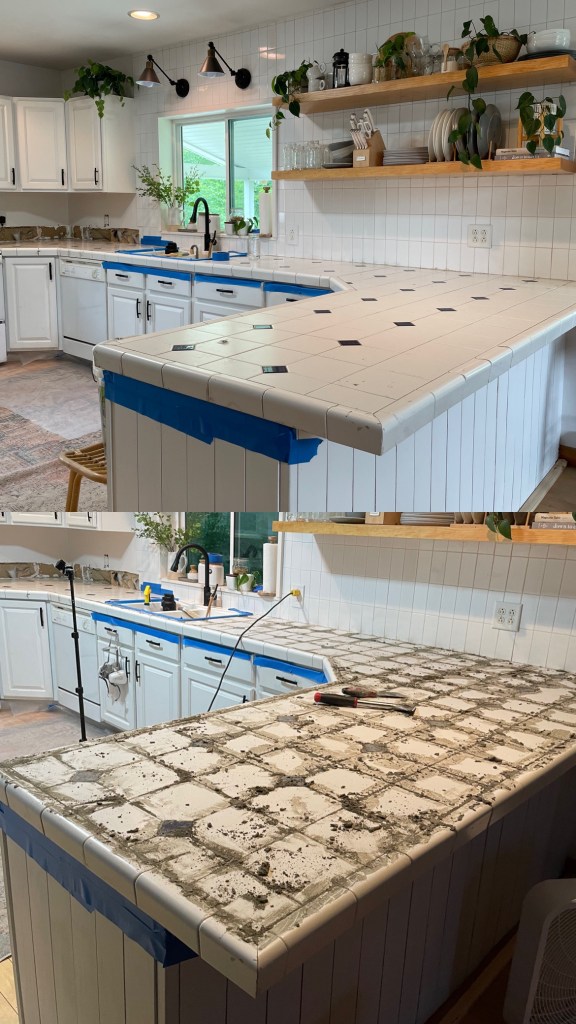
Hello!! Welcome back!! It’s been a while, but let’s chat about leveling tile counters!! I used concrete to get rid of the tile grout lines in my counter that caught all the dirt, coffee and other crap your counters see, on the daily!
Supplies—
– 2 x FastSet Self- Leveling Floor Resurfacer from @quickcrete (50 lbs)
I wasn’t planning to keep the concrete color, dark grey wasn’t in my kitchen plans for the counter—I was deciding between doing another round of contact paper (cheaper option) and if it doesn’t work again (rips/cuts/peels) then I will do epoxy! Again, all fo these are temporary—so we can save up money for a kitchen reno in the next 5ish years.
1- I cleaned, scrubbed the grout lines
2- Used the fast set allcrete- mixed with water and used spatula to apply in a thick paste to the grout lines—waited for it to dry about 20 minutes and then scratched the concrete off the tile so it was only in the grout.
3- Used concrete bonding primer- poured it into a paint roller try and used a 3 inch brush to apply it to the entire surface- concrete and tile. It is an Elmer’s glue consistency and color—it paints on really well and I did it pretty thick—not thin!
4- Waited about 24 hours for that to dry, which isn’t necessary just what I had time for
5- Next was mixing the self-leveling floor concrete! I recruited my husband to help me mix and pour—mixing was an interesting process! You should only add a little water at a time! But adding a couple cups of concrete and a little water, mix and then slowly add in both till you get a good amount to work with- we tried for almost halfway up the 5 gallon bucket—at a time- this was a good amount of us to work with.
6- The first part (left of stove) we did not get as watery as we needed— was too thick, it needed me to move it around and help level with a trowel. The next spot (to the right of stove all the way to the sink) we got the perfect consistency—watery to the point of thin smoothie—it poured on well, spread really well and dried super even.
7- Then I needed another bucket to finished the corner and L/Island (as a call it even though its not) – went to lower to get another bucket
8- Mixed the rest in a watery consistency again and it went on well! I had overlapped two different layers (first I poured before my trip to lowes and then the new concrete 1.5 hours later) and there was a slight different just as they dried at different times, but it sanded off really well.
9- Waited 3 days for lit to fully dry!!
10- Sanded using my dewalt circular sander, used 120 grit sandpaper to sand out bumps and drips that dried, inconsistencies in levelness , clumps we didn’t mix out (one bucket dump in particular had lots of clumps ;p) – I used 3-4 different sand pads because the concrete is really hard so it tore up the paper quick.
11- Concrete creates a lot of dust!! Especially since it was in the house, not garage I hooked my sander to my shop vac (after a couple minutes =— very dirty in my house) ! most sanders have the attachment to hook to almost any shop vac! It is so so helpful
12- Next I cleaned the counter really well with water! It wipes up ok, not a super smooth surface but level and amazing!! So much better than before
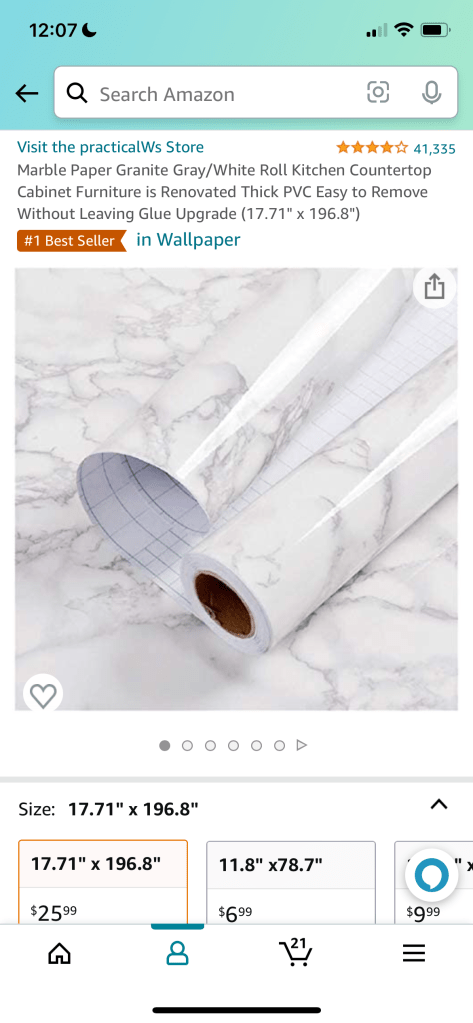
13- Next up is contact paper!!! I bought a thick option on amazon! Waterproof, durable, shiny (gloss finish) – it is really great. Much better and higher quality than my last option (which stayed on counter for 1.5 years! Even with all the rips and cuts from tile grout liens it still looked good. I have high hopes for this paper!!! Ill link it at bottom for sure.
14- I again asked Matt for help! Contact paper with one person is almost impossible! Two people is very helpful/ almost necessary!! Especially on a large scale like the large surface area of the entire counter.
15- I bought a little application tool pack (smoother thing and exacto knife) that helped a lot with application.
16- First I dry fitted the first piece, and then we slowly removed the paper, I smoothed out all bubbles and adhered it to the counter while matt slowly pulled the paper off the back- he also was kind of pulling to keep it all centered, we kind of used the laser level to keep checking we were outing it on straight, as last time some of the pieces went on diagonal—we learned a lot from last time and our application process was much better. Last time matt only made it one long panel and quit, but this time he made it all the way to the riht of the sink!! Lol
What room would you like updated? (living/ dining/ bedroom)
What do you wanted added? (paint, wall treatment, wallpaper)
What would you like removed?
What is your design style? (boho, farmhouse, modern, industrial)
Do you want new décor/furniture? (rug, couch, chair, art etc) I will search products and add to mood board if you want
Do you want to add a design plan for the space?
Do you have a budget for the space? (under/over $500/ $1000 etc)
Send pictures of the room you’d like updated—of all 4 walls, and a video is possible—
Send dimensions of room— example 10ftx12ft
Budget– Depending on room size, wall treatments, wood, paint, design plan or décor desired
We will be charging for all supplies we buy such as wood, paint, rugs etc. Receipts will be given, virtual design mood board will be made for the space before rugs, furniture will be purchased.
This was a special DIY project as we had never owned an RV or renovated one before! The whole entire process we learned from Youtube! We had no idea of a budget before we started, we just knew that in order to make it across the country and back- for ourselves- it had to be in great condition! I wanted it to look amazing, but also be budget friendly. I feel happy with the outcome of total cost & also pleased with how everything looked & how well it held up for our 3 week long trip!!
Living room/ Dining room –
Rug (80/60-$140
Light fixture x2- $45
Shades x2- $230
Curtains— $24
Couch- $315
Couch cover – amazon-$40
2x cushions Walmart- 30×2— $60
Butcher block table- $180
Fire place $ 226
Circle Mirror- $25
Pole wrap— $150
= $1,309
Painted ALL rooms Sherwin Williams Snowbound in Satin, added new cushions to the table, made a butcher block table but used the same size as old table (traced shape) and used the same hardware to make the table still able to turn into a bed. Replaced light fixtures and used LED light bulbs which were added to every light fixture in the RV .
We made the blank wall into a more aesthetic/ cozy feature wall- we added an inset wall fireplace with a mantle. Both the fireplace and the mantle had to be extremely skinny (no more than 4 inches) as the front slide has to move in front of. To add the fireplace we removed the wall panel, used 2x4s to create a box frame in between the studs for the insert to sit inside the wall. We then cut out a hole in wall panel for the fireplace frame to fit thru and the put on the face frame on. It was a very quick and easy, but impactful DIY for this space.
Bedroom and closets were painted the same color- SW Snowbound, gold hardware- both pulls and knobs were placed. Two gold sconces were updated. I used a sharpie and a level to create sharpie shiplap. I spaced the boards 6 inches apart from each other. And did 2-3 passes with sharpie. Used bedding from target.
Bathroom–
Faucet- $50
Mirror (already had)
Peg hooks (already had) Walmart
Light fixture- $40
Light bulbs (amazon) — $50
Faux marble stick on tiles- (HD)— $25
= $165
Updated faucet, light fixture and mirror- paint walls SW snowbound and used peel and stick faux marble tiles from HD. quickest flip, but so impactful.
Kitchen–
Butcher block counter- $250
Faucet- $65
Pulls – amazon- $36
Tile – home depot- $250
Grout( already had)
Waterlox- $100
= $701
Primed and painted cabinets, removed old countertops, replaced with butcher-block, added real tile backsplash and grout I already had. Used same sink, but new gold faucet. All pulls were updated to gold modern (came in 25 pack on amazon).
SUPPLIES:
Flooring!!- traffic MASTER— $386
Paint—$90
Primer KILZ- $21
Wooden dowels (curtain rods) lowes- 30
= $480
TOTAL= $ 3,035
I think I missed some products, but I rewatched all the reels and believe I added everything!!! If I missed anything let me know! And as always DM me with questions or link requests!! Thank you so much for everything or following this journey