
Supplies-
– 4x 4×8 ½ in plywood sheets
– 3x ½ inch drywall
– dust control joint compound (I used almost a whole tub of 3.3L pail)
-drywall tools (joint knives, scrapers and mud pan)
– clamps
-HD flexible PVC corner bead
-drywall T- Square
-folding razor blade (utility knife)
– Dewalt router
– Router bit
– Dewalt drywall cut out took
⁃ dewalt brad nailer
⁃ Paint: SW Snowbound and
-BM Odessa Pink (lightened by 20%)
⁃ Drywall shaver
-sanding blocks— 120 and 220 grit
-dewalt battery shop vac— THE BEST TOOL EVER

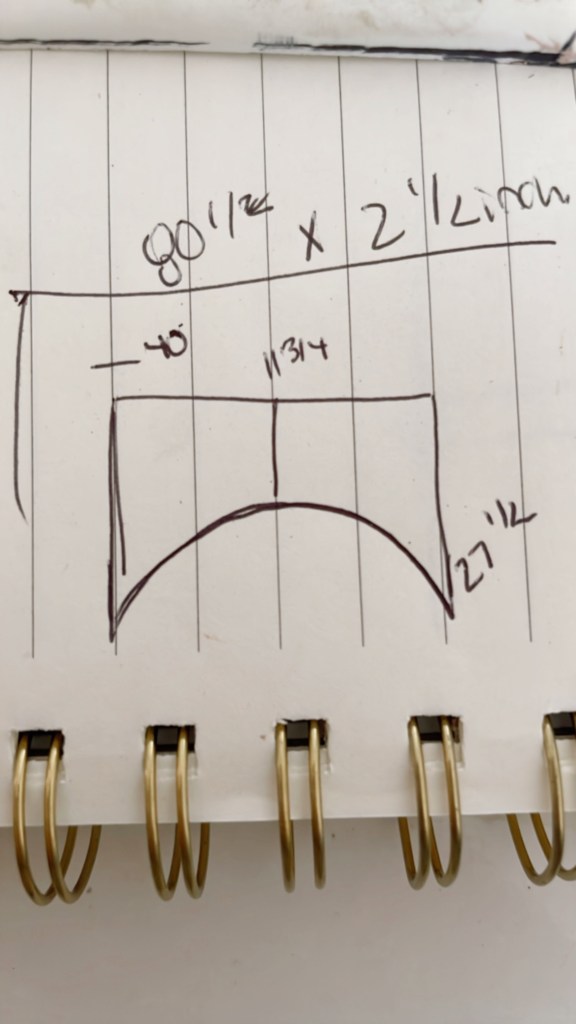
Step 1- Math😅 – I measured the room, the wall I wanted the 3 arched on & started to calculated the proper dimensions. Example- the distance between the three arches, the radius of the half circle/arch, the height of arches in proportion to the wall size. I ultimately chose the arches to be around the same height as the door trim- so it would look rather symmetrical even tho only doing 3 arches next to the door.

The arches are all the same size in height and radius, but the distances between the three are different- just due to where I wanted them on the wall and the length of the wall (minus the door).
Step 2- Building- We used the table saw to cut down our straight pieces of plywood for each side of arch. It was 4 total for either side of the 3 arches
3- Next, Matt created a jig (guide) for the router- so that all the arches will be the exact same- it is essentially a stencil
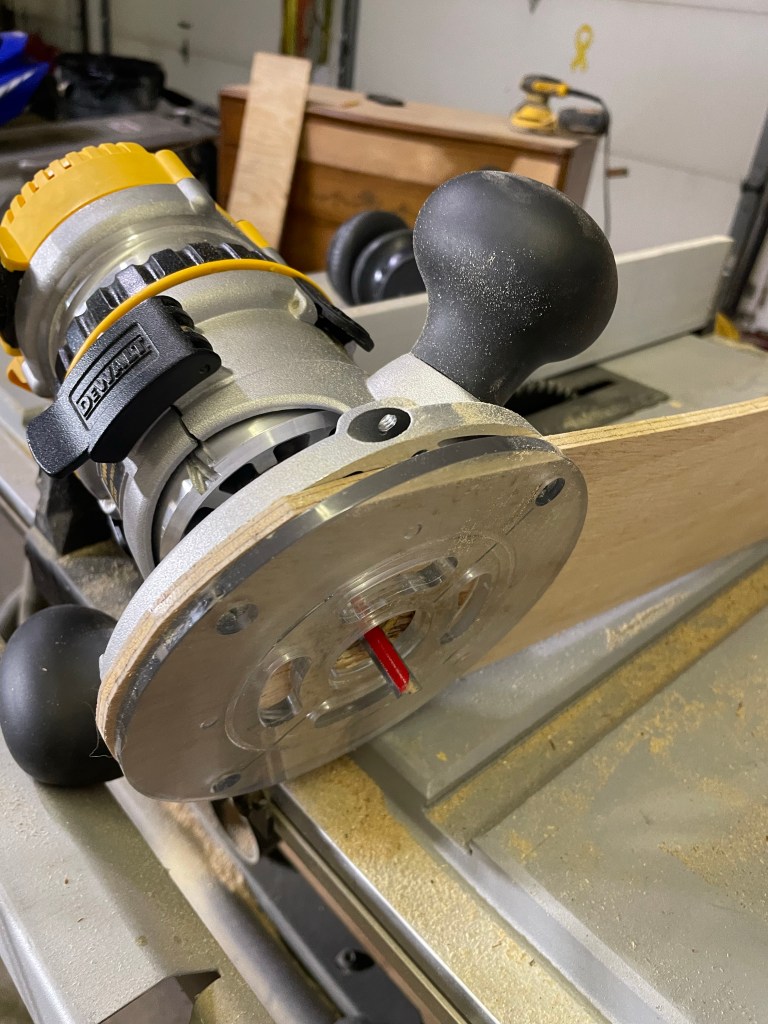
4- Once we had the dimensions and jig, we took the ½ inch plywood and started to measure out and attach jig- it attached in the exact middle of the arch or the center of the circle
5- Used the router to cut all three arches to these measurements
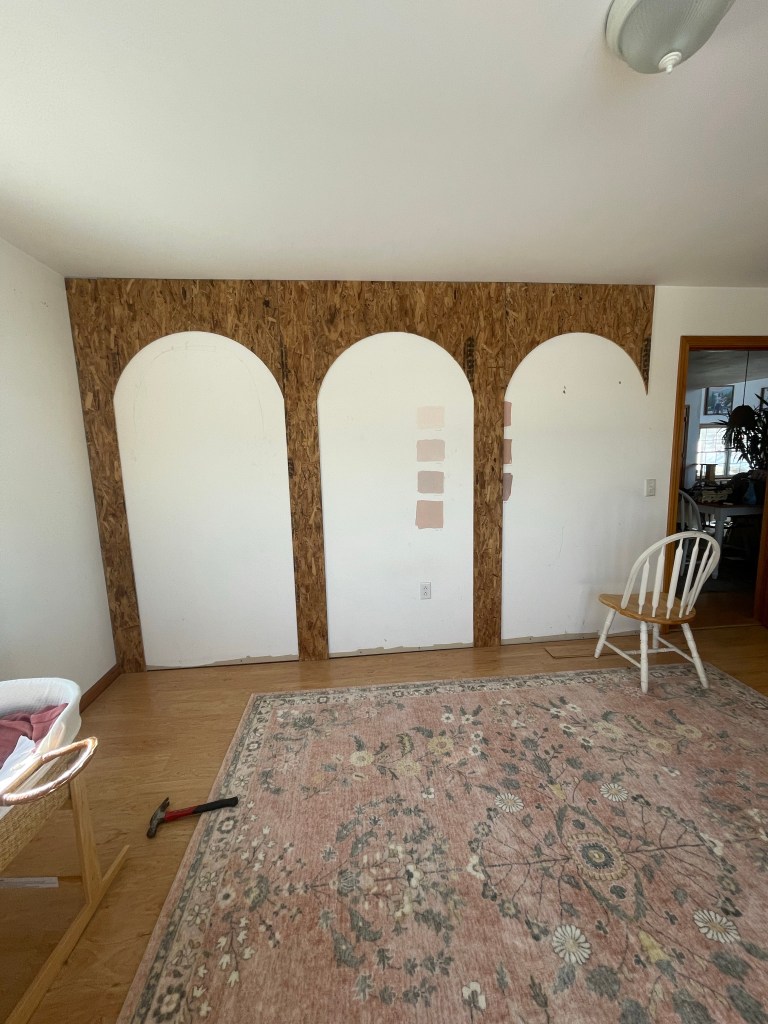
6- Went into the room, dry fit everything to make sure the arch looked good, right measurements and proportion- then cut the next 2.
7- Used the dewalt brad nailer to attach the plywood pieces to the original wall
8- Next was drywall! I cut the straight pieces of drywall, just like I did the plywood (same dimensions). When cutting the straight pieces of drywell though, I used a razor and straight edge with clamps to make sure the edges were are straight as possible.
9– I placed the drywall onto sawhorses and then used an arched cut out from the router as a guide to cut around- I bought a new tool for this part- The dewalt drywall cut out tool- it took some time and some swearing to get it to work properly, ultimately matt has to use a separate tool to tighten it enough that the bit didn’t fall out—eventually it worked well on the third arch.

10- next I used drywall screws and my drill to put up drywall. I had to shave some some pieces to fit exactly. And once the arches were in place I used a razor blade to cut down the drywall that was overarching the plywood- bc the plywood arches were exactly perfect I made the drywall a little bigger so it could be carved out.

11- flexible corner bead— the MVP of this project for sure!!!!! I bought ours at Home Depot and it was very easy to find and use. The dimensions of it were a little too thick— so I had to trim off like 1/4 of an inch to fit, but once it was on it was great. I used the same drywall screws to attach it and some of the plastic stuck thru song I cut those off with a razor- after the fact Matt looked up that you can use a stapler/staple gun and the likely good that the plastic would stick up was a lot less- so maybe in future I’d use that.

13- drywall!!!! I used screen tape for in between all the sheet is plywood I put together and alot of mud. I made the first coat thin. I added alot of mud to the arch- in between the drywall and corner bead & let dry. I sanded with sanding blocks (180 grit) in between coats. I did approx 5 times sanding and re-coating which was a day each time. I used a fan and closed the door to the room as the smell while curing was rather strong.

14- once I didn’t have any more bumps in the drywall I used a 220 grit sanding block to get it super super smooth and wiped with to wet cloth to get all dust.
15- cleaned and vacuumed and mopped for hours— so so much drywall dust!!!!!!
16- primer!! I used PVA primer

17- paint! I used Benjamin Moore Odessa Pink in satin- lightened 20% — two thick coats- I LOVE the finish of the paint and the quality— honestly more than SW which I thought I’d never say.

18- cleaned more!!!!!
19- then ready for beams🎉💪🏼
My whole process is posted into videos, reels and in the “ARCHES” hightlight!! Thanks for following along!! @vt.diy.home
