
Exciting news!! We did our first project for a Client!! It was a very cool experience! Let me share all about it & the process!
Here are some questions that I asked my Frist time clients! –
– what do you want updated/changed/improved? (which room, wall, paint, feature wall)
– What do you want added?
– what is your budget?
– Do you want me to do the project only or decorate also
– Do you have any inspo pictures for the space (image, wall, room ,color scheme that they love)
–
I personally plan my 99% of projects from Inspo pictures- usually from Pinterest or Instagram.
Before pic—

Olivia sent me this beige color board & batten pic, the vanity she bought for the space— I love white and matte black & adding a neutral beige colors was beautiful together.

Her overall home style is Modern Boho, the same as mine! So obviously I was excited & could see what she wanted for her bathroom.
Plans– circle mirror, more modern light fixture, LED bulbs, new black knobs for the cabinet- Paint, board and batten== beautiful update!
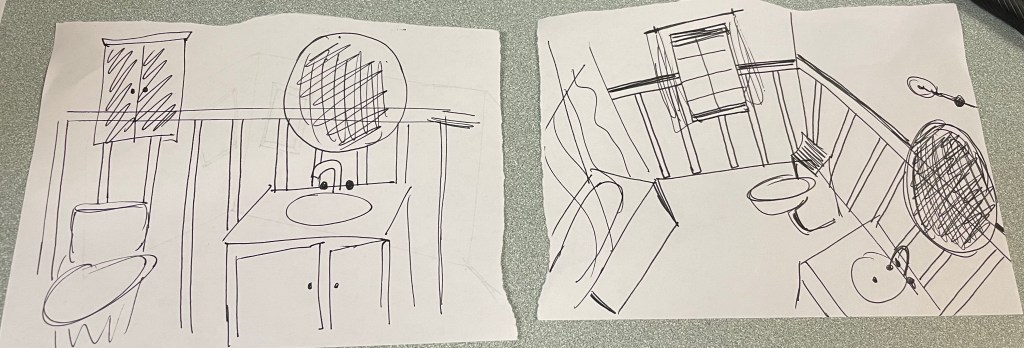
Here is the mood board for the space & my rough sketch.

Steps—
1- Removed old vanity, checked out plumbing situation, what supplies are needed, ability to turn off water etc.
2- Started measuring and deciding on placement of board and battens. I chose to do them 12 inches apart,
3- Then picking the placement of battens- you can pick where you want everything to start—where you want the symmetry to be. I did not necessarily center my B&B with the light fixture or mirror bc I didn’t visualize the new mirror or vanity in place. But, the 12 inch gap is small enough that the likelihood that it would be “centered” or relatively close, was enough for me.
4- So I placed the 1/4th inch x 3in pieces around to room. Placed one, marked 12 inches from each board to the next board. A couple I had to cut (under window/ under cabinet), but I placed the vertical pieces first. In hind sight, I would place the long horizontal top piece on first, as the seam would have been more “seamless” and less wood filling required. The room itself was not level, the baseboards were not level, the cabinet above toliet, the walls, corners etc. this isn’t abnormal, but the top piece has to be the most level and I chose to do it last- next time I will do it first when doing a small space such as such with unreliable levels/ angles.
5- I used my air compressor brad nailer from Milwaukee—I love it. You plug it in, turn it on, the loud compressor pumps air into tank, it turns itself off when tank is full and you are able to nail! Eventually I would like to get a cordless option, but for now this is reliable and one` of my fav tools ever.
6- Once all battens (vertical and horizontal) pieces were in place, I used minwax wood filler to fill all nail holes
7- Then used dap paintable quick drying caulk to caulk all edges of wall to wood meeting (so either side of every board and the top where the horizontal meets the wall.
8- As I stated in my stories, the humidity on this day was horrible. The paint wasn’t drying, and caulk was not drying either. This took some extra time and patience.
9- Next was (supposed to be primer) nothing would DRY so I went straight to paint—I used SW Assessable beige on the bottom. I used a paint brush to get all corners/ tight fits of the battens, then rolled with a normal 8 inch roller size. (2 coats )
10- Rolled the top 2/3rds with my fav white paint—Snowbound (2 coats) around the top of bathtub/ shower and entire room.
11- On the shower side of bathroom there was a section that I added a 1×2 to the top of B&B—it added a nice top finishing detail. Ideally I planned to put it around the whole bathroom, but it would have caused the mirror to stick out the same distance—2 inches which would have looked a little odd. Chose to only do it on that one wall with the modern towel hooks.
12- Painted the cabinet above toilet
13- Hung new mirror with anchor
14- Changed out light fixture, added new bulbs
15- Then brought in new vanity—matt ( my hubby and plumber) did not buy enough pipe for the plumbing job. It was larger and more labor intensive than he or I anticipated, so It took the whole day and we had to go back for 2 hours the next day with the additional pipe to finish off the vanity/ water hookup. But we put tit in place and everything looked great (centered wise with in the B&Bs)
16- Added new matte black towel hooks, toilet paper holder. Added a picture frame to above the towel hooks
17- When we came back the next day- we finished up the plumbing, some paint touch ups, painted over drywall holes that wouldn’t dry previously (;p)
18- Then styled & revealed it!
AFTER!!


Supplies— (from Lowes)
– B&B’s—poplar ¼ x 3 inch x 4ft long x 25 boards total
– Shelf top pine 1×2 x8 — x1
- 3 pack rollers ( purdy white dove)
- 3 pack brushes (Valspar)
- 1 roll Frog tape
- 2 gals SW snowbound in Satin (HGTV Showcase line)
- 1 gal SW Accessible beige Satin (HGTV Showcase line)
- Paintable Caulk (Dap)
- 1 gals primer
- Circle mirror (tj maxx)
- Black/ Gold light fixture (amazon)
Then! All my tools!!! Which I will be doing a separate blog post on! “My DIY Essentials” (stay tuned!)
All links to bathroom are in my Instagram bio! Link to amazon storefront and to LTK
Thanks for reading & following along on this new client journey with me!!
Lauren
